Table of Contents
...
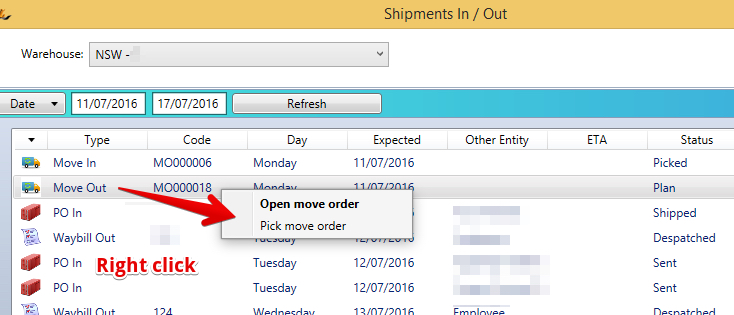
To Start the Picking Process - start at the in/out dashboard and open the picking screen
| Note | ||
|---|---|---|
| ||
|
Use the Action Menu
- Print Picking Documents
- Enter all picks
- Action "Mark as picked all lines in picking status" (either line by line or overall)
- Lines that have not been picked yet (short picks for example) will still be on the top of the screen -
 cannot enter CON Note number until these lines have been cancelled
Planning a Pick
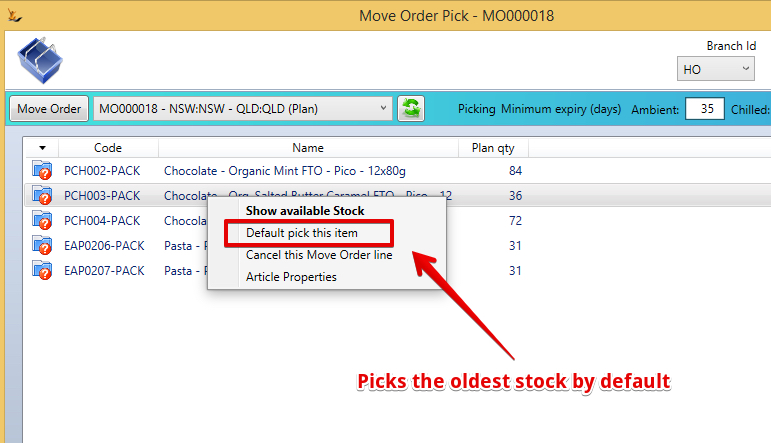
Plan where to pick all the required items - either one by one or using default logic
Can use Default pick logic (Oldest first)
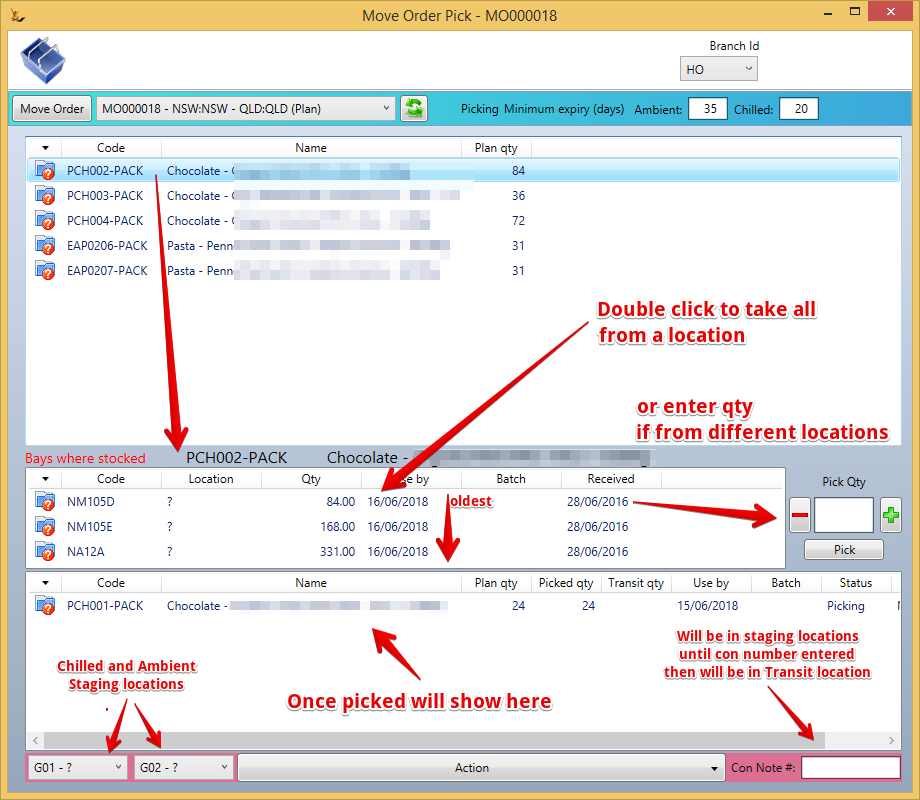
Can Pick Plan each line individually
- Select the line
- Select where to pick that line from
- Print the pick list once all lines are planned
Only the plan quantity below in the bottom grid will be populated.
Confirm each line actual pick quantity - either on mass using the action menu - or one by one using a right click
- As each stock line is picked the stock is moved to the inTransit location
- Move order status is updated by the status of the stock items (will not be picked until all are status picked).
- Can add items if status is plan, picking or picked.
- Any line that is picking or picked can be unpicked - stock will return to the location it was picked from.
...
- (Right click on picked line)
- Right click to cancel any line if required (for example to mark move order to transit)
...
- Move order cannot move to transit status until all lines are completed
Set to in-Transit Status
If all items are either Cancelled or Picked - can use Action menu to set to Transit Status (all lines will also change to transit and shipped qty will be updated)
- Cannot unpick once in transit status.
- Once in Transit status - can print delivery docket.
- Once in Transit - can roll back to pick status.
If want to roll back completely - move back to pick status - manually unpick each line until all are unpicked - will have option to cancel.
...
| Note |
|---|
you may have to change the warehouse filter to see all relevant journals Any discrepancy will be stock adjusted in the transit location before it is received in the destination warehouse. This adjustment will therefore not show if you are filtering the stock audit display by a warehouse. The Move Order discrepancy report explains clearly what has happened and what needs to be done.The discrepancy report can be printed or emailed at any time from the Move Order Status menu. Automated emails are sent to branch managers involved for any discrepancies found. If the warehouse managers after discussion
The journal GL Accounts used is based on the Discrepancy Reason chosen by the receiving user.
No stock is left in a transit location or in any questionable state - stock adjustment journals are complete before the move order can be closed. Move Orders with discrepancies can be listed from the Purchase Order from PO to Goods Receipt#PurchaseOrderReports Move Orders tab. Select Show exceptions only and Show closed orders, click Refresh and look in the Discrep column. |
Damaged stock write offs / count discrepancies
...


