Use Sidebar LHS to navigate
For global help click here
2. Inspector onsite (Android) - example property inspection
Persons who complete reports may be your employees or may be contractors
Provide them with the appropriate role so they get access to their reports
They will need to download the mobile application
This is an example of use of SaaSplications - every business is different and SaaSplications is extremely flexible
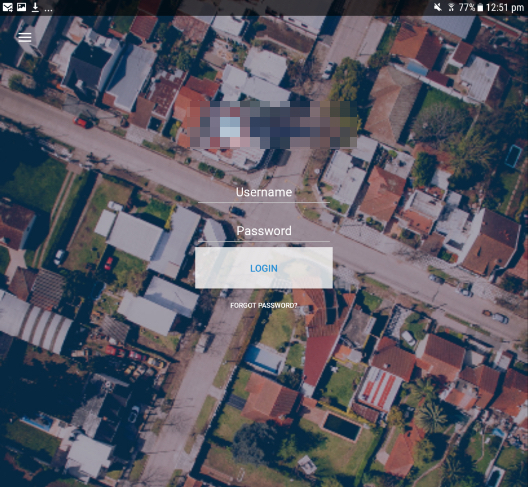
Login
Login is recommended before reaching site to ensure a good internet connection when downloading the report.
When onsite work offline if required
Username and password will be remembered for future logins.
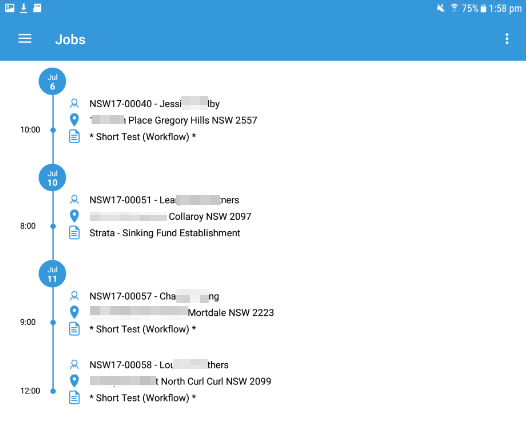
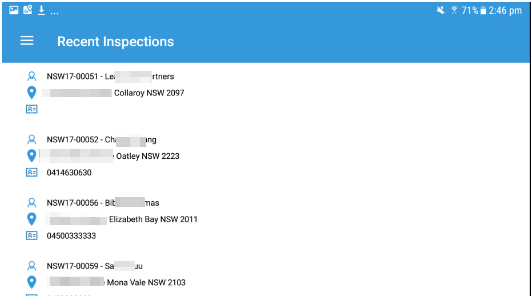
View your Job Dashboard
It will refresh/update automatically with jobs every 15 minutes. Alternatively, you can refresh the screen real time (use 3 dots to expose button)
Jobs will appear in date order first (oldest to newest) and then time (first job of the day to last)
Hamburger options
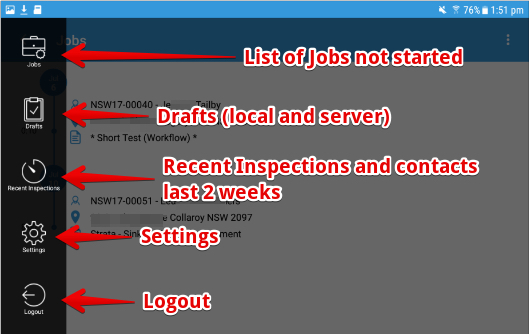
Settings enables the ability to avoid uploading photos when in poor network area or when using an expensive connection.
When re-enabling upload - Select "Upload Photos" option from Draft Menu to begin photo upload
Drafts - still not completed
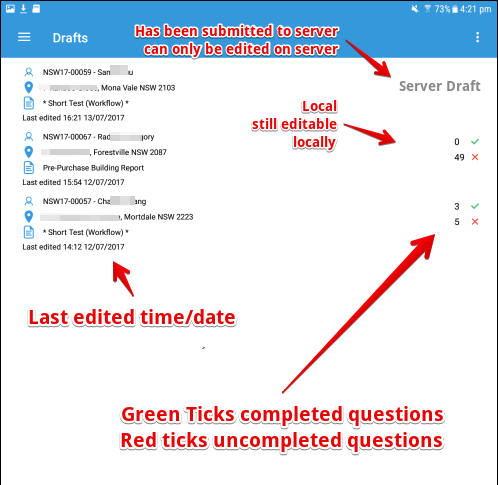
If a report is saved to the server and the wireless connection is off - it will be marked as a server draft and a Warning symbol will show it has not yet been uploaded. see inspectorrole-Saving/Submittingareport
Recent - completed - reviewer may require updates
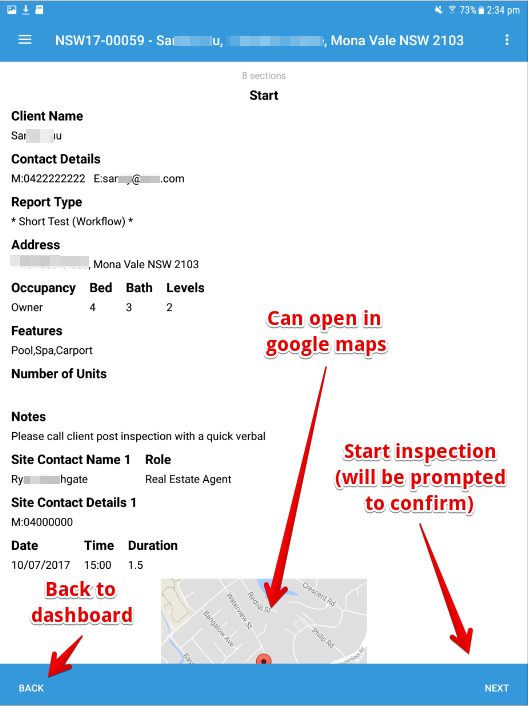
Start an inspection (tap on the job)
Starting an inspection will move the job to "Drafts" status from the Jobs list and all updates from the Server will be ignored
Acknowledge WHS declaration related to this site

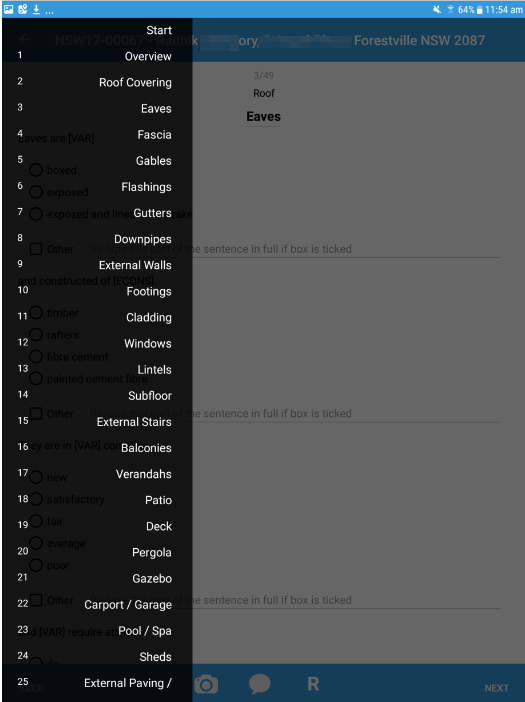
Navigation to Anywhere - or step through
Entries are saved up to when “Next” has been selected. If you leave the screen to navigate to another application, entries on the last page will not be retained. Always remember to select “Next” before navigating out of the app.
All inspections, once started will appear on the Drafts page on the device. You can continue to edit Draft jobs from this screen.
Ensure you use the zoom on your device to zoom in on specific defects or items you are trying to capture in the photo.
Labelling of photos is available via Server Access (refer to Editing a Report in the Server in this manual)
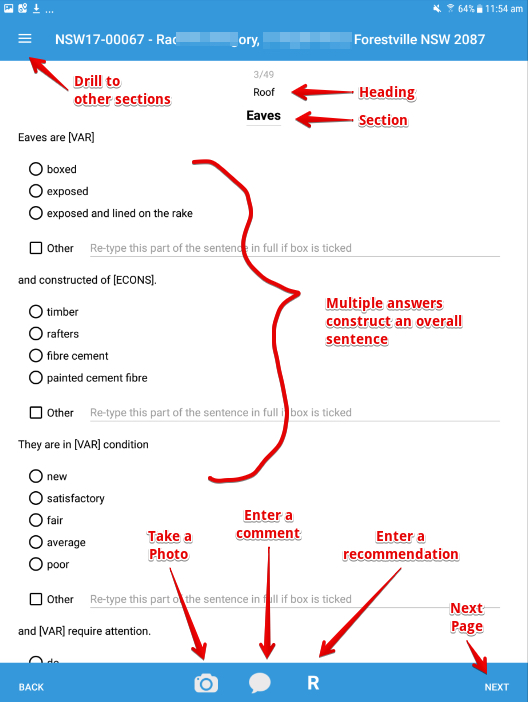
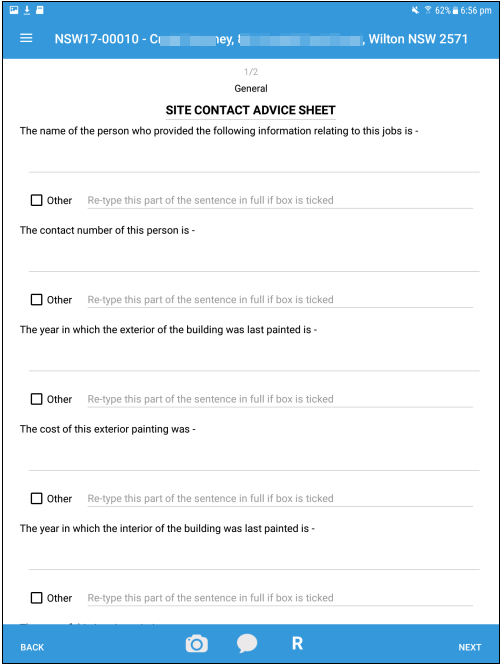
Radio buttons selections
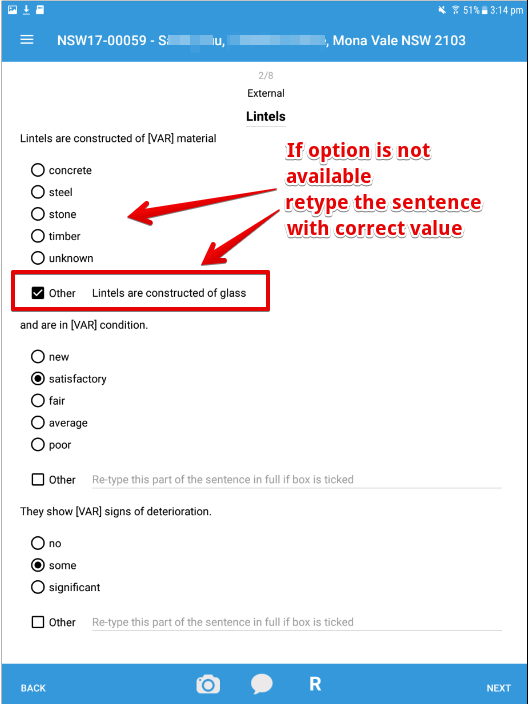
Other / Other N/A checkbox option
The report will construct an overall sentence using the alternative text typed - ensure it fits in with the flow of the sentence
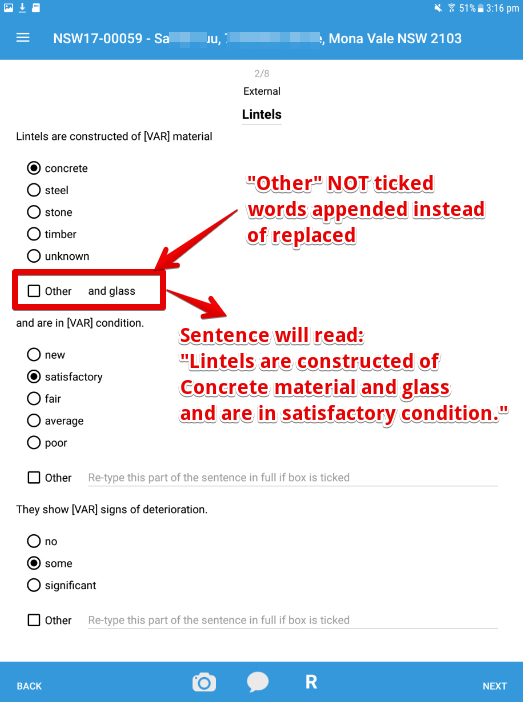
If only some words are required - do not tick the "Other" box - but do type in the words required
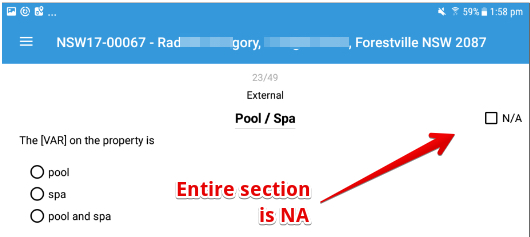
Section NA
Some sections will have an N/A option at the top of the page - Section “N/A” indicates the entire section is not applicable and should not appear in the report.
Sentence other NA
All sentences will have either an “Other” (described above) checkbox or an “Other-N/A” checkbox. “Other-N/A” provides you with the option to indicate the sentence is not applicable and should not appear in the report or you need to retype the entire sentence.
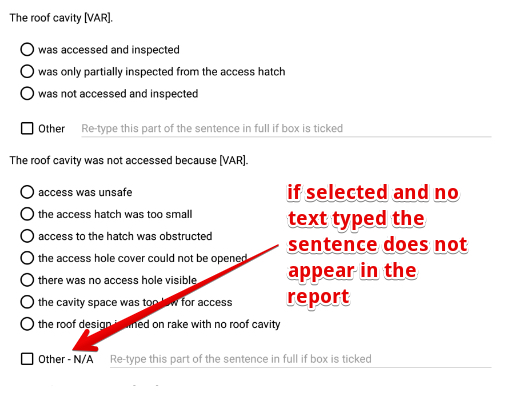
A prompt will appear

If selected as not applicable then:

Otherwise type the text that is to appear.
Recommendations and comments
Work the same way
Counters show on the bottom icons in each section
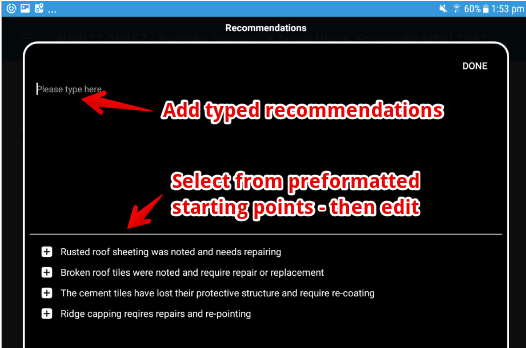
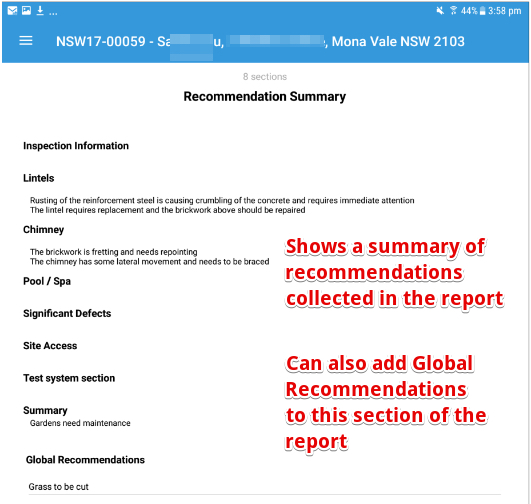
Recommendations and Comments in the Report
Where recommendations and Summaries present in the report depends on the report layout.
Comments and recommendations are linked to the section they are entered in and appear in that section of the report.
A summary of recommendations may appear under the Recommendation Summary page and may also be summarised at the end of each report.
Comments typically are not summarised
Photos
You will need to allow the local application to access photos on your device
Take photos - or use existing photos - if taking a photo will be provided a view with option to retake or keep.
All photos taken will be stored in a single folder on your device that will be automatically created - deletion is not managed.

Marking up Photos
To mark up a photo within a report (ie insert an arrow or draw a box around part of the image to draw attention to a defect), it is recommended this photo be edited on a standard desktop device using a picture editor.
Save the report to Server as a Draft and then insert the marked-up photo into the section of the report using the server view
Uploading when online
Photos are only uploaded when "Upload Photos when online" is selected

Photos are attached to Draft Reports - use the three button menu
Reviewing completed sections
A report can only be submitted by ensuring all sections and sentences have been completed or actioned by selecting a radio button. The report can be submitted as:
- a Draft to the Server (for further editing in the Server)
- a Final to Server (finished and no further editing required) by ensuring all sections and sentences have been completed or actioned by selecting a radio button.
The End screen provides an overview of completed sections.
- A Red cross indicates the section is not complete
- A Green tick indicates the section is complete.
Accessing a section from this screen can also be achieved by tapping the section name.

Saving / Submitting a report
Save from the bottom of the End Screen = save options
- Save as local draft
- Save to server as draft
- Submit Final Report
upload from the drafts page - three button menu "Upload Drafts"
The Next button saves any page - if you nav away from a page without choosing next the page will NOT be saved
If no wireless is available when a job is submitted as final to the server, the job will move to the “Recent Inspections” folder and display as offline. To submit this report once you are back in a wireless zone, you must “Refresh Jobs” from the Jobs screen. It is likely this job will upload automatically - but to be safe, you must always refresh jobs - and then check that the job is no longer marked as ‘offline’ in Recent Inspections.
If a job is marked as “offline” regardless of how it was saved, the job and its photos have not been uploaded to the Server. To ensure these jobs are updated to the Server, you must select either “Upload Photos/Upload Drafts” for the draft to refresh, or select “Refresh Jobs” on the Jobs screen for any offline jobs sitting in Previous Inspections.
Offline processing
At any point in time, if you lose internet connection, you can continue to complete the report - the data will store in the App.
If you are working in the app while online and your device gets damaged - the server will have the last save or next done.
Other Report Types (off system)
These are reports that are done for others to their questions - a small list of questions to indicate the job has been completed or capture some information may be required while using the other companies system or paperwork for the detailed questions.
Example short list of questions
Login to Server
You can only be logged in once - either on a device or on the server. When signing in any existing sign-ins will be ended.
Editing a Report on the Server
No edit of the job details
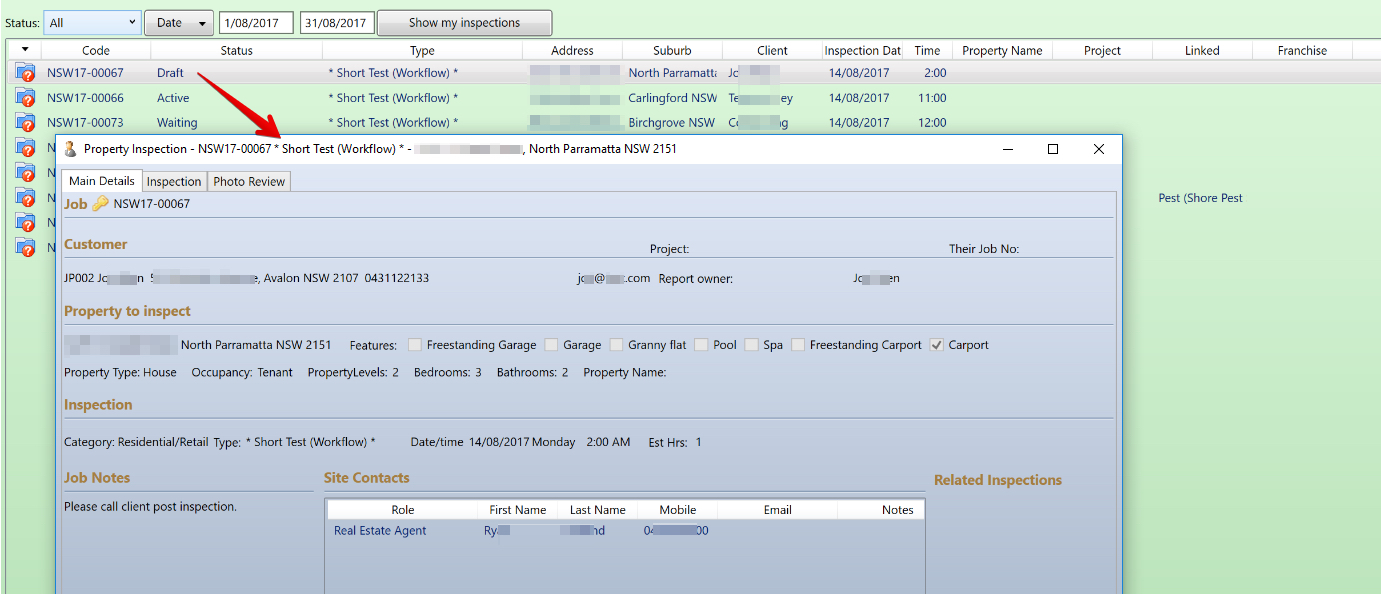
Select Inspection Tab - Previewing a section to start editing
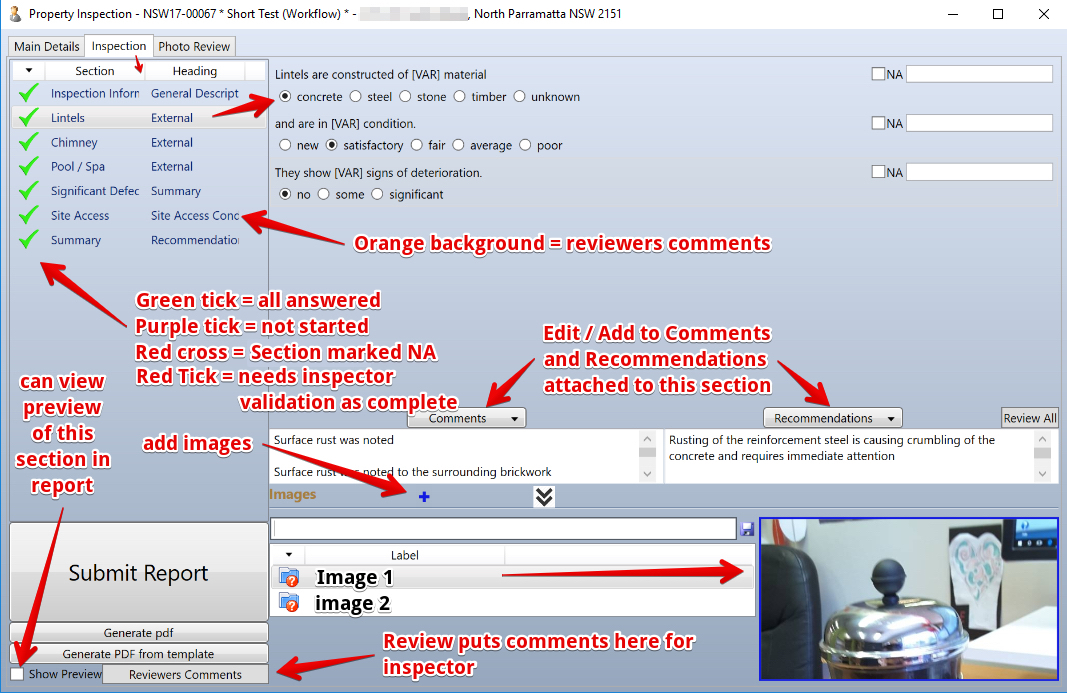
The Comments and Recommendation buttons are dropdowns that list possible templated responses for this section that can be added to the existing responses.
Adding additional photos (use + button)
Hover over the screen to get the upload image button - upload - name - save

Can open images in a simple editor to markup

Can review all images in one place
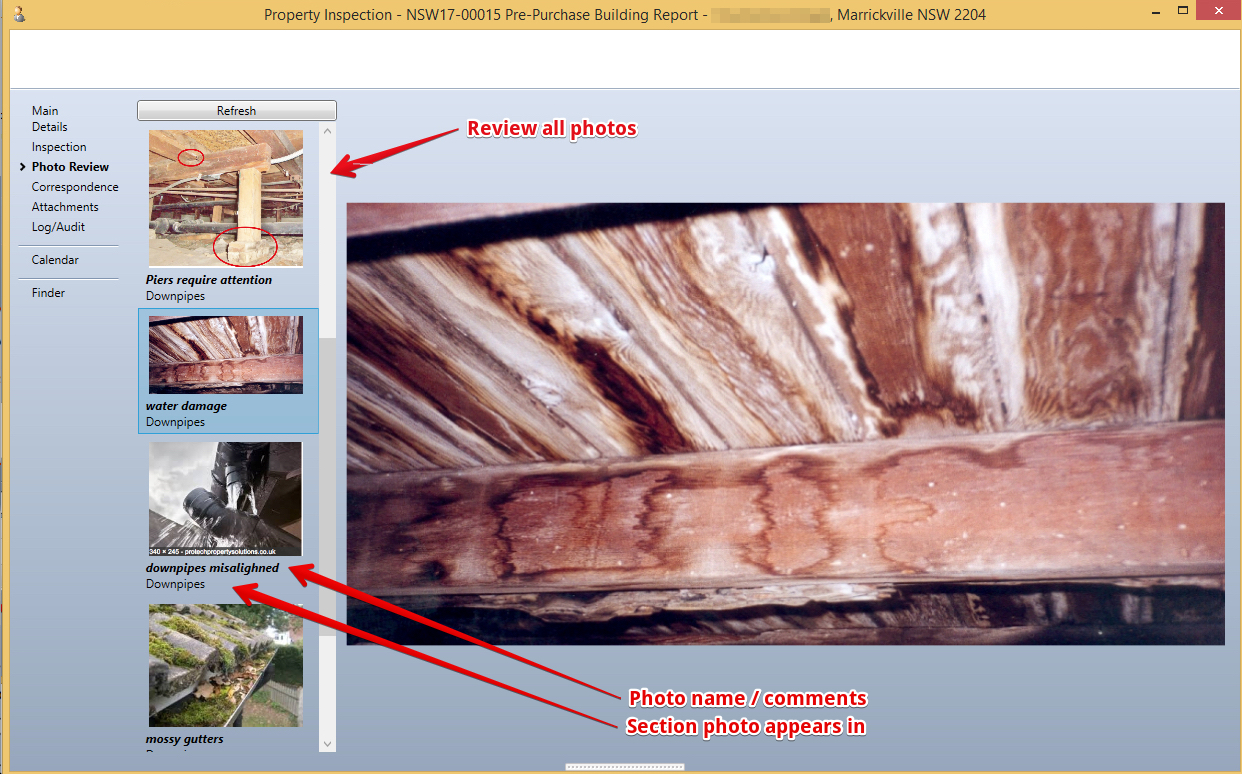
Review All Button - shows all recommendations in the report grouped by section they have been added to

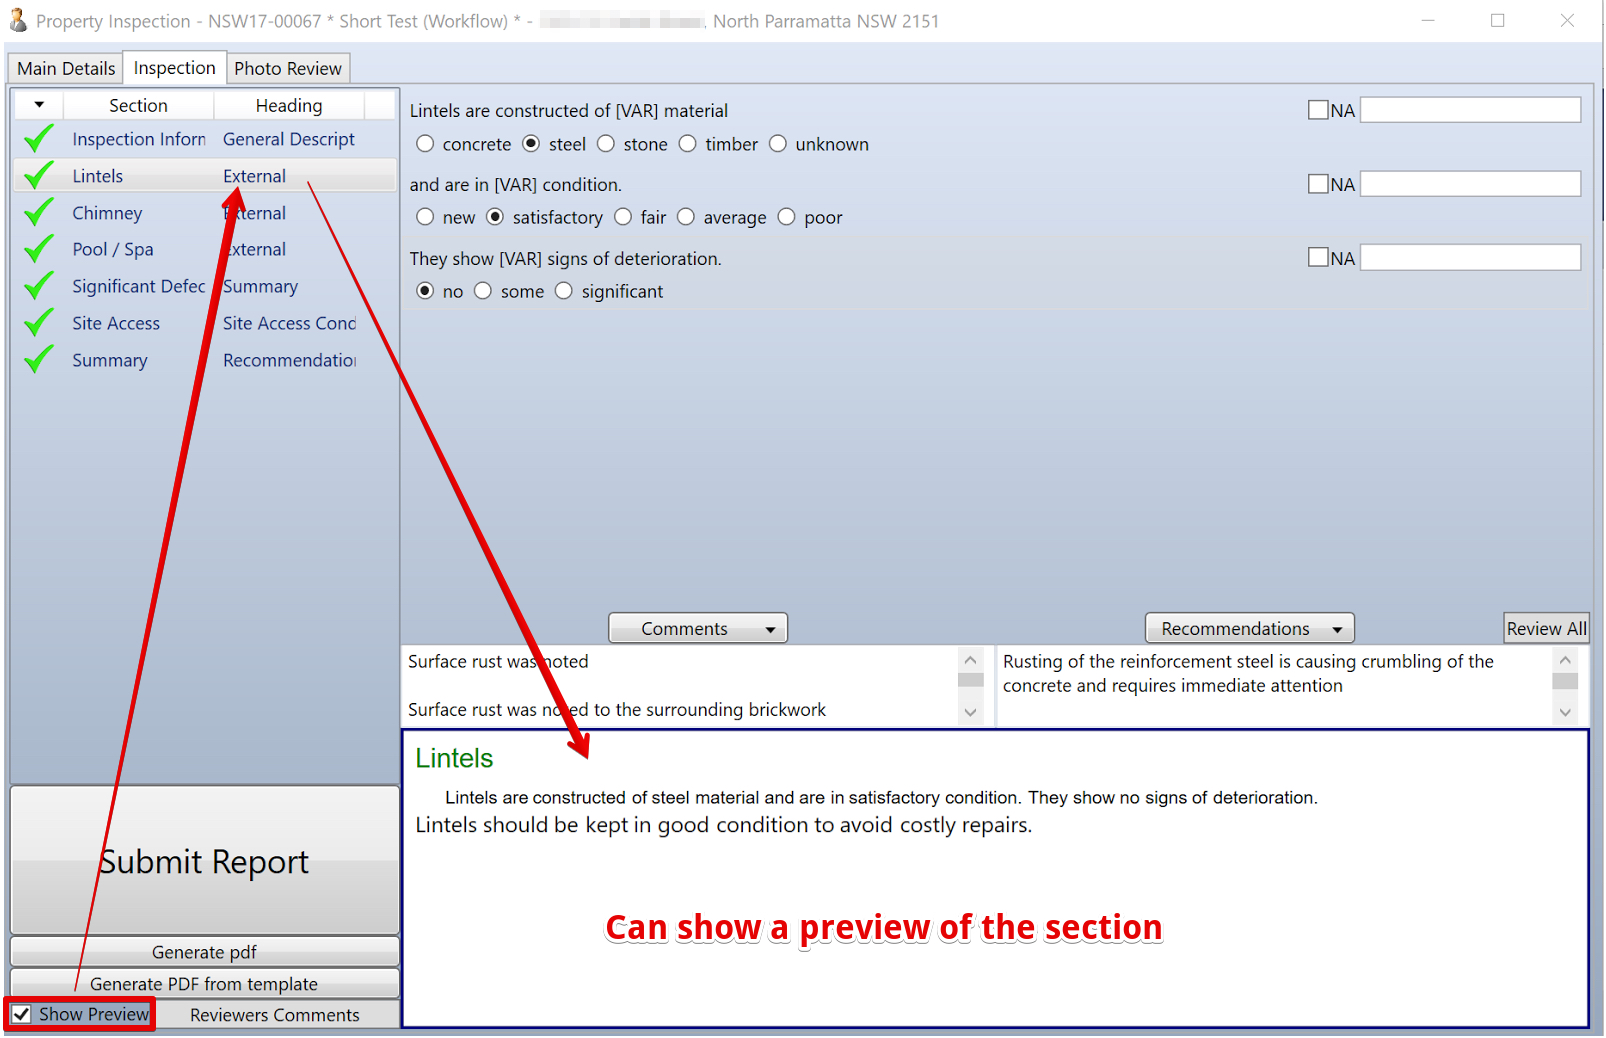
Preview a section to see how it will look in the report
When a section is complete - mark as complete
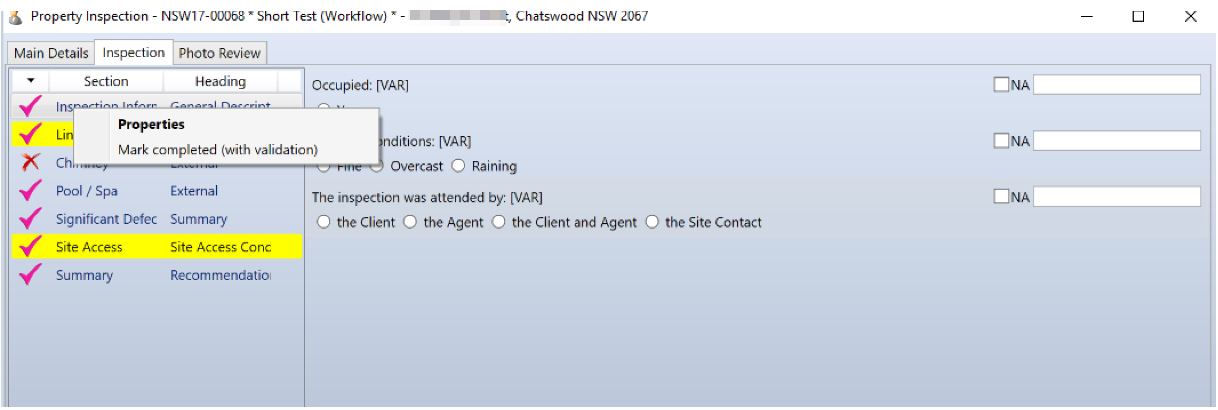
The system will validate and a green tick will display if passes validation.
Once it appears as a Green Tick, it cannot be reversed to a Red Tick
If all sections are not validated, the inspector will not be able to submit the report.
Offline on Paper - can use pen and paper to fill in a report
A PDF for answers to be captured offline

Submit Report
If all sections are not validated, the inspector will not be able to submit the report.
Selecting this option will submit the report as complete to the office for review.
Once submitted, the inspector will not be able to make further edits to the report.
A pop up will appear confirming it has been submitted
Rework Report
Reviewers Comments
Reports commonly require second or third reviews. Reviewers can provide comments that are then acted on by the report author.
Sections with Reviewers comments are in Orange - select the section - the reviewers comment appears above the reviewers comments button (when selected)

Accessing inspections when device has failed
View your inspections / Prepare for offline
Jobs currently in Client Device will appear in the top section of the screen.
Selecting Recent Inspections will display all jobs currently assigned to the inspector or in the process of being assigned.
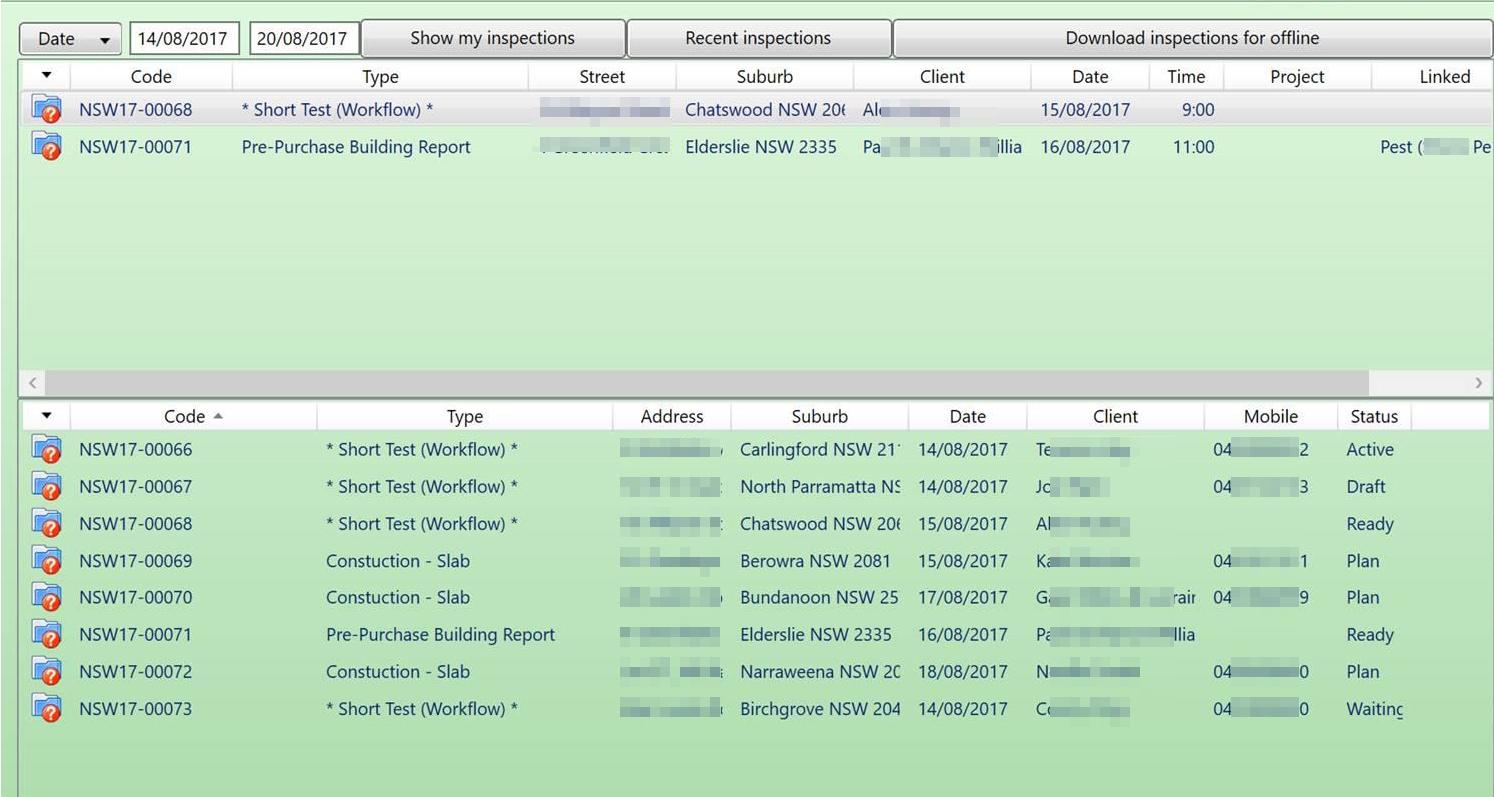
Status Definitions
STATUS | INSPECTOR ACCESS - Server | DESCRIPTION |
Plan | No | Not yet sent to App or inspector. This job will not appear on the dashboard as yet as the office is still in the planning process. |
Ready | No | Job has been allocated to the inspector and will appear on the Dashboard |
Active | No | Inspector has commenced the inspection and is on Android as a draft or inspection in progress |
Waiting | No | Inspector has submitted the report and Server is waiting for photo uploads to occur |
Draft | Yes | Inspector has saved inspection report as a Server Draft and wishes to continue with further edits via Server. Final report submission will need to occur via Server. |
Submitted | No | Inspector has submitted report as final. Only office can make further edits |
Rework | Yes | Office has sent report back to inspector’s queue for further work/editing |
2nd Review | No | Office is 2nd reviewing report (internal) |
Review Ok | No | 2nd review is complete by office (internal) |
Closed | No | Report is finalised and has been sent to the client |
Installing the Application
Unlock the block function
This allows an installation for Applications not in the google store


Click the link in the email sent to you - select "Download" and the app will start to download
Go to "My Files" on your device and select "Downloads"

Downloads list - select latest and install
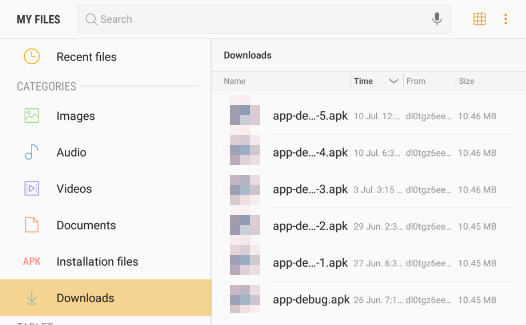
Once installed - click open to go to the login screen
For information about SaaSplications go to http://saasplications.com.au