Table of Contents
| Table of Contents |
|---|
Overview
Regular stocktakes stock takes ensure the inventory levels in your account are accurate. You can require that all items get counted or enable updates only on items you do count. Stocktakes are designed as a two count process to cross check counts. Stocktakes enable you to do one of:
- Reset your stock to a counted quantity - if you do not need to create adjustment journals
- Reset stock to a counted quantity and create adjustment journals for variations
At a high level
- Choose if you are doing a complete full count (all items not counted are written off) or only counting a few items
- Do a first count
- Do a second count
- Compare the counts - recount the differences - and update the second count to be correct
- Journal the stock changes in the system.
How to use the StockTake
- Choose the Location you wish to count in '''Root Location''' - all locations below this in the hierarchy as set in Stock Location will be counted
- Choose the Mode you plan to use
- '''Full Mode''' - require a full count of all items
- '''Counted items Only''' - only updates the item or location combinations that get counted and ignores not counted. The system therefore assumes that any item or location that was not counted is correct in the system and does not need to be counted.
- Can seed the list of items that are expected by location into the form using the Action button when using '''Counted Items Only''' and each item will have a zero count as default hence you will have to count every item so this option effectively becomes a full count required
- Enter some '''notes''' about the stocktake for later reference
- Check '''Date''' is when you want journals to generate and '''Save'''
- The screen will populate with the locations '''Search Code''' and '''Name''' with a '''No''' in '''Finalised''' column
- Stock Take Status will move to '''Planning'''
- When ready to count '''Action Button''' enables you to '''Start First Count''' - Status will move to '''First Count'''
- To update counts
- Double click on the location to populate it into the form
- Search, use Barcode or Enter the Article that was found
- Enter the Quantity and the Use By for the item
- '''Save''' each combination of item count and expiry for the location
- Once location has all counted items added - select '''Counted''' (may say Finalised) next to the Save button and save the location update
- ''Note can hide Counted (Finalised) locations so you can see only the ones that remain to be counted in the list''
- ''Note that multiple persons can be entering counts at the same time for Count 1''
- At any time can run a report showing counts vs original stock level differences using the Action Button
- When finished use Action Button to''' Complete first count'''
- Stock Take Status will move to '''Second Count'''
- Enter counts as for first count - multiple persons can be entering counts at a time.
- Once completed use Action Button to '''Close Second Count and Report Differences''' and a list of discrepancies will popup.
- Stock Take Status will move to '''Finalising''' Action Button has options:
- Report Differences between Counts
- Can update 2nd count if differences found - second count will be used for new stock levels
- Report Differences between This stocktake and system stock levels
- Can update Count 2 until ready to journal changes as completed
- You must run this on your machine for the next steps to be made available
- Report Differences between Counts
- Can update any of the values in the finalising stage to the final values wanted
- Journal stock differences (as reported) and close will create journals and write off stock to the account nominated in Symbols Config "Stock TakeAdjustmentGLCode"
- '''Use this data as initial stock ''' will not create any journals - all stock will be reset to the values counted and will also delete all history for the stock
- Stock Take Status will move to closed and you have completed the stocktake.
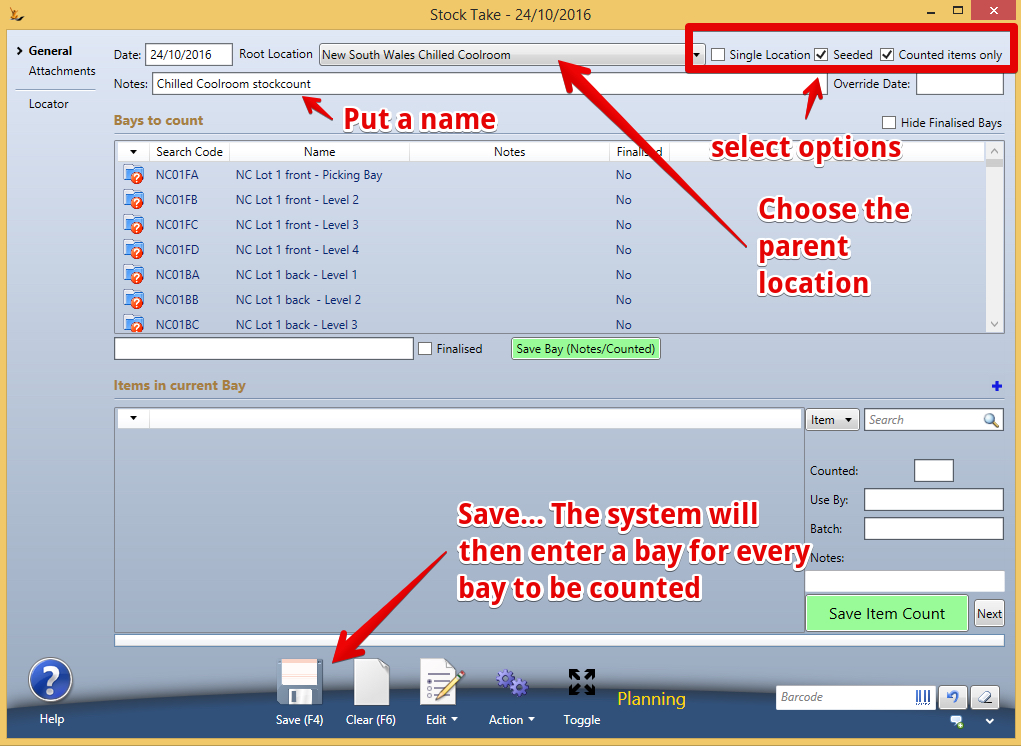
General Tab
Locations
- '''Date''' is the date that the journals will take effect
- '''Root Location''' is the highest level of the Stock Location that is to be counted. All lower levels in the hierarchy will be included
- '''Action button''' has next available Stock Take Status and ability to print reports
- '''Status''' for the stock take shows adjacent to the action button
- '''Notes''' allows free form descriptive notes to be held against the stocktake
- '''Mode''' has two options
- Full - all items in locations chosen must be counted
- Counted Items Only - only items that you count will be updated - all others will be assumed to be correct - note that this is not the case if you chose
- Once a stocktake has been saved (and hence created) the list of locations will be shown
- Doubleclick or right click to select a location from the list will populate the location to the line in the bottom of the section.
- '''Hide Counted Locations''' will ensure the list shows only those still to be finalised
Items in a Location.
- Can enter a barcode to enter your item if you have a tablet and a barcode scanner attached.
- Item if no barcode can Search for an Article. Note once this field has been populated can navigate to the properties of the Article
- Counted is counted quantity
- Use by is use by date for counted quantity
- Comments can be added
- Save to add the count to the list of items counted in this location
Summary by Item Tab
Shows a list of the items affected by the stocktake, the bay affected the quantity, the useby, the average buy price and the stock cost total. A total valuation impact is also calculated across the stock take.
Master List Tab (Locator Tab)
A list of all the stock takes that have been done and their status. Doubleclick or rightclick Select to populate the stock take record into the rest of the form.
Setup
Note: ''To use stocktake you must
...
- Create a new config key called StockTakeAdjustmentGLCode (The Value must be the GL account code).
...
Warehouses and Stock Locations that hold stock are "Lot / Pallet Bay"
| Note |
|---|
if a stock location has multiple stock items in it and that stock bay is counted - only the counted items are updated UNLESS counted items only is ticked. So if you want the stocktake to remove items that are not there either
|
Options:
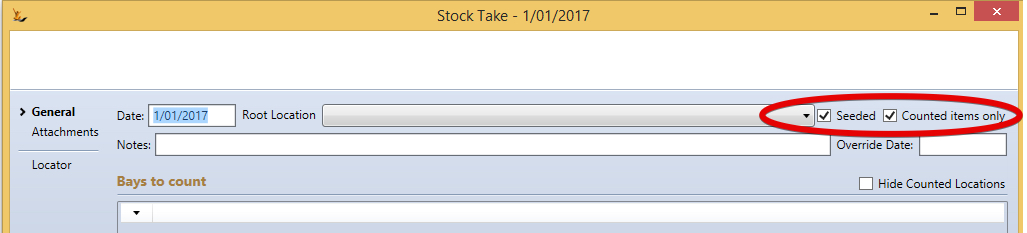
- Seeded
- Selected = will seed the stockcount with items/Expiry dates you expect to find but no counts
- Not Selected = no items seeded - must manually enter all items.
- Counted items only
- Not selected
- all items must be counted
- any not counted will be removed from stock
- Selected
- only the items with a count in count 2 will be updated
- Uncounted stock items will not have their count updated
- Not selected
Shortcuts
Can Copy Count 1 to Count 2 and then finalise from Count 2. This effectively means you only do a single count
Can print out the current stock levels of all stock the system thinks is in the counting locations to compare with counting sheets
When using Seeded Stocktake - the counting sheets are the same layout as the current stock level sheet - so it is easy to look for discrepancies between the system levels and the counted levels.
When using counted items only - you can enter only the stock items you find a discrepancy.
- So count some or all items using paper
- compare to the stock levels using paper stock levels printout
- mark on your counting sheets only those that are different
- check count them
- Enter only those item counts into the system (much less data entry)
- Finalise the stocktake
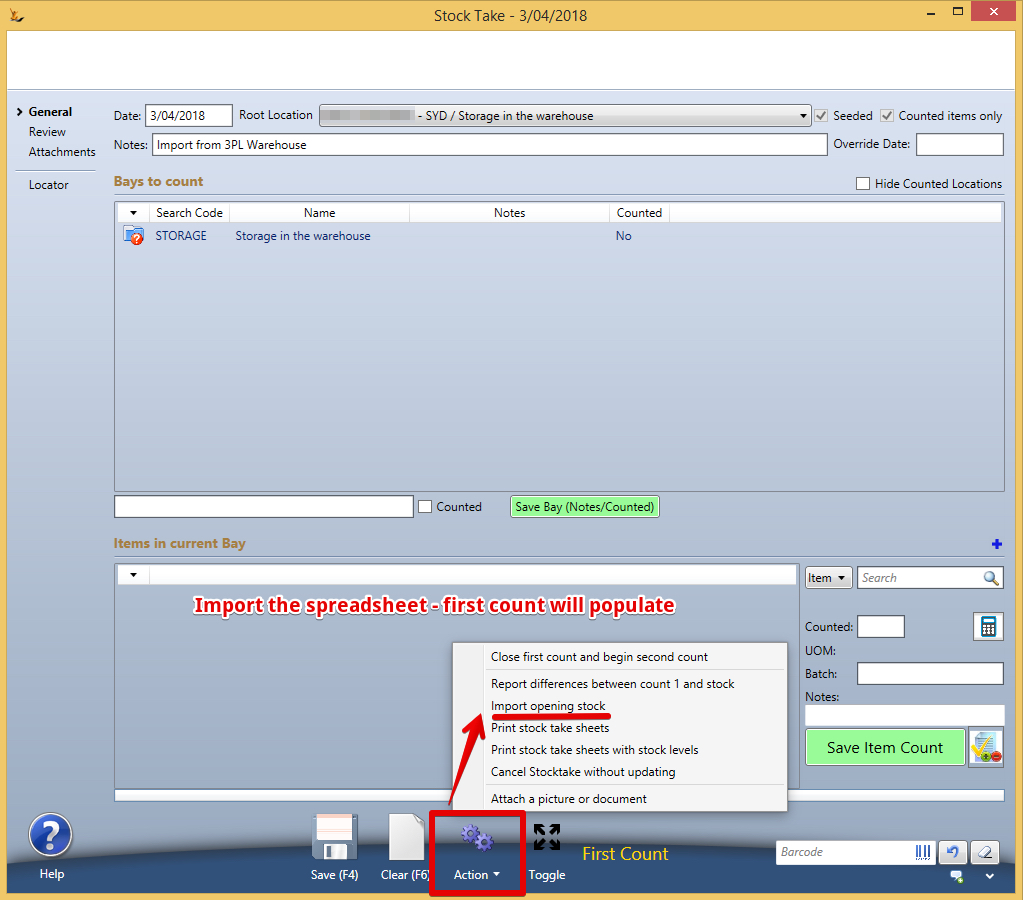
You can import an excel sheet with columns Bay, SKU, Qty.
Drag the spreadsheet over the screen - upload - choose "Use as initial stock" - it will populate the stock count.
Retail Stocktake
The retail stocktake screen uses scanners to count stock and is very fast for a retail setting where multiple persons count the stock in a single stocktake.
The stocktake is defined and count started using the normal stocktake screens (Below) - the stocktake is done using the retail stocktake screens.
Below image is screen Stock>Stock Take
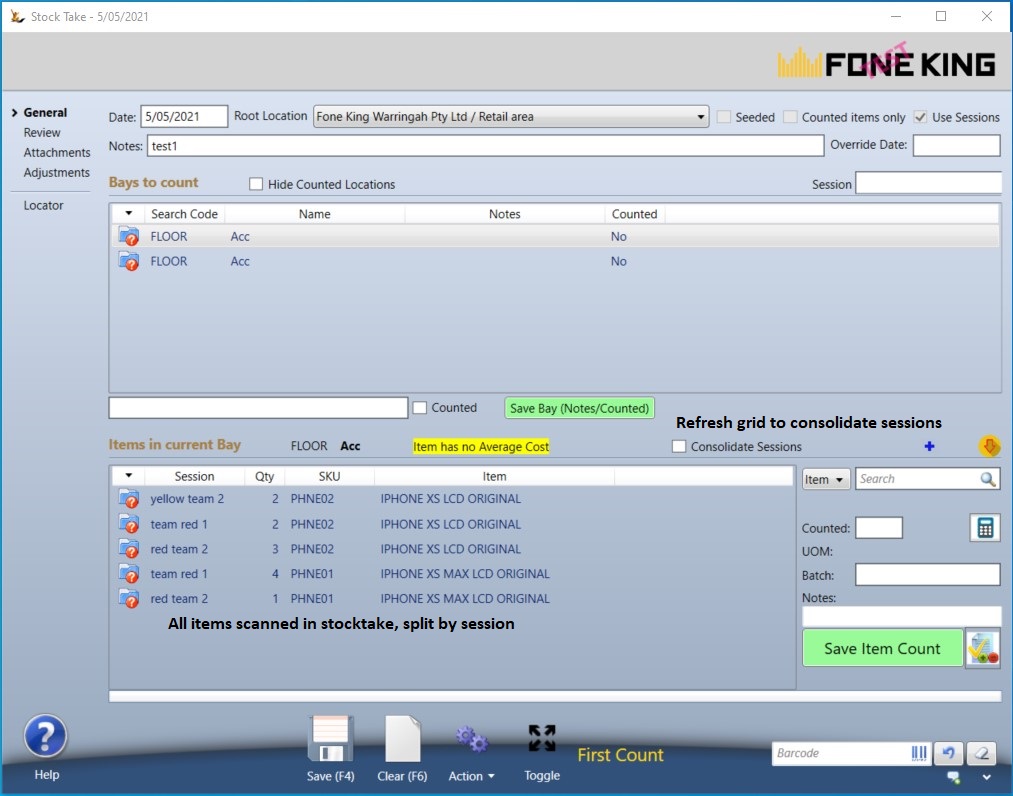
Addition of Sessions. Sessions can be used if you want each logged in user to see only the items they scan and not other users. This can be useful if there are SKUs in multiple areas throughout the stocktake
Below image is screen POS Point Of Sale > Stock Management > Store Stock Take

There is no provision for capturing expiry dates unless the barcode includes the expiry dates of the product.
Process
- First Count
- Second Count
- Finalising
- Create Journals ( second count vs current system stock levels )
You will need Secure Features#IsStockManager to perform stocktakes
Initial Stock
| Note | ||
|---|---|---|
| ||
When setting up a new company that has existing stock - you can count the stock and not write journals - instead using a single journal line for the stock value. This feature can also be used to count stock that you do not need to do journals for adjustments - for example stock held on consignment At end of count 2 "Use this stock as initial stock" - requires
|
Before you start
| Note | ||
|---|---|---|
| ||
Stock is not normally stored in a floor area - a floor area is where stock is checked before being stored, or assembled to go out on an order. If any selected level to do a stock count has stock in a floor area then the stocktake cannot be started until any stock in an included floor location has been put away. The move order form will open. |
Seeded stocktake (system provides a list of what you should find in the location)
The system provides a list of the products that you should find in each location including batch numbers and expiry dates - but not stock counts.
Seeded stocktakes are faster - however users tend to look for what they see on the screen rather than check all the stock in a location.
Seeded stocktake is recommended for quick stock checks.
Seeded Stocktake combined with Counted Items only allows only the items counted to be included - so it is easy to count only a brand or location.
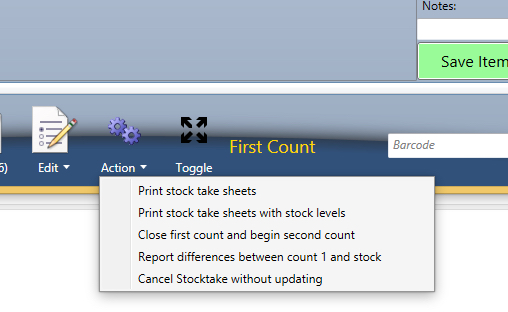
Creating a stock count
Action - Start First Count
Once first count is started there are a number of print options. A manager is likely to want to print stocktake sheets with stock levels to compare with actuals.
| Note |
|---|
If doing a Retail Stocktake - use the retail stocktake screen for counting via barcode 32965437 Barcode scanners can also be used with the normal counting screens (at the same time) if you need to also select from known expiry dates as you count. |
Any Stocktake (including 3PL check counts) - upload of XLS
If you use a 3PL warehouse who send you XLS current counts on a regular basis - you can create a stock count by uploading the xls file to compare with system stock levels.
The import simply updates the count information instead of manual entry - follow the rest of the process as described below.
Column headers in the spreadsheet = SKU, Qty, Bay
Ensure there is no formatting in your spreadsheet to upload

Drag the XLS onto the screen once in first count
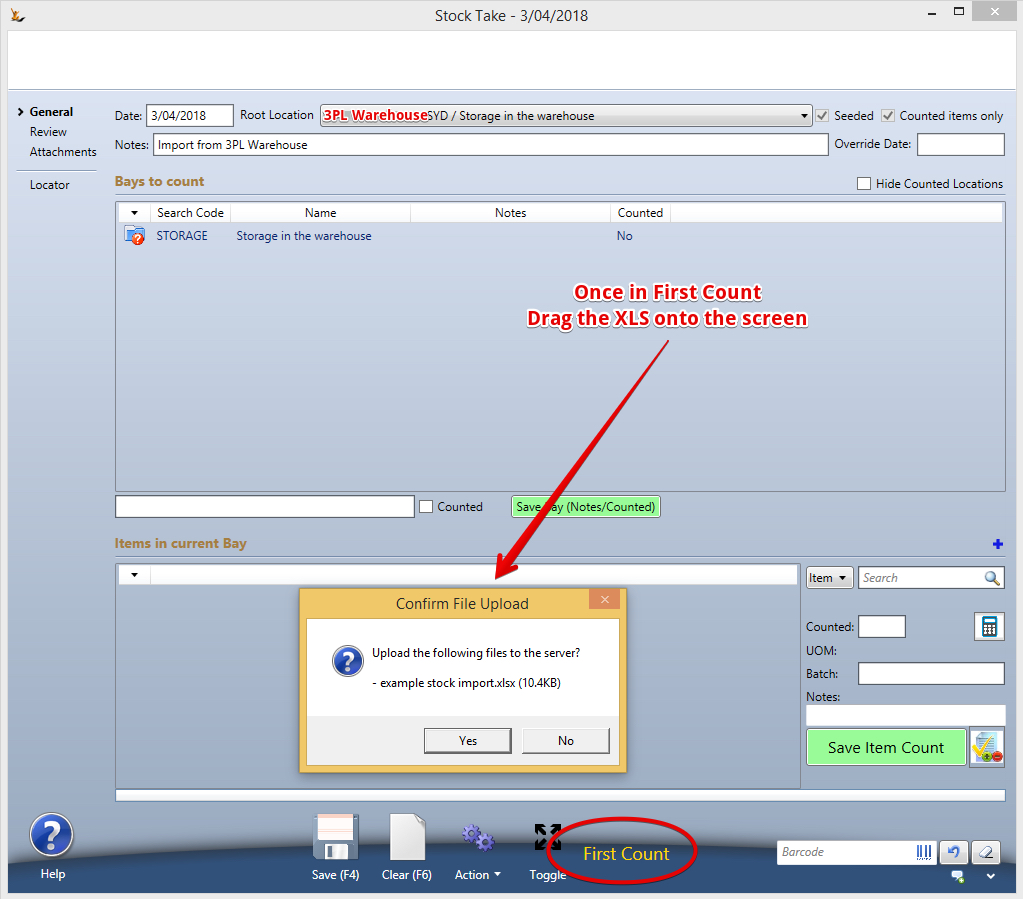
Then import the stock count
Counting sheet printouts
Seeded Stocktake - printout has bays, stock article expected - but no count
Not Seeded Stocktake - printout has bays only
Counting
Enter stock articles, counts, expiry dates and save.
- If you enter the wrong expiry date you will be prompted for the correct one. ie if you enter a different expiry date to one that exists in that stock location.
- The dropdown list shows all possible expiry dates for the stock based on PO receipts for 1.5 x max days expiry for the stock article
Delete any count using rightclick in the grid
Multiple users can be entering counts at the same time.
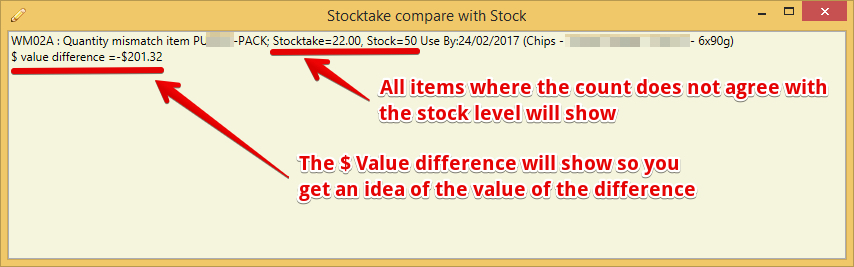
Can compare stock with count anytime
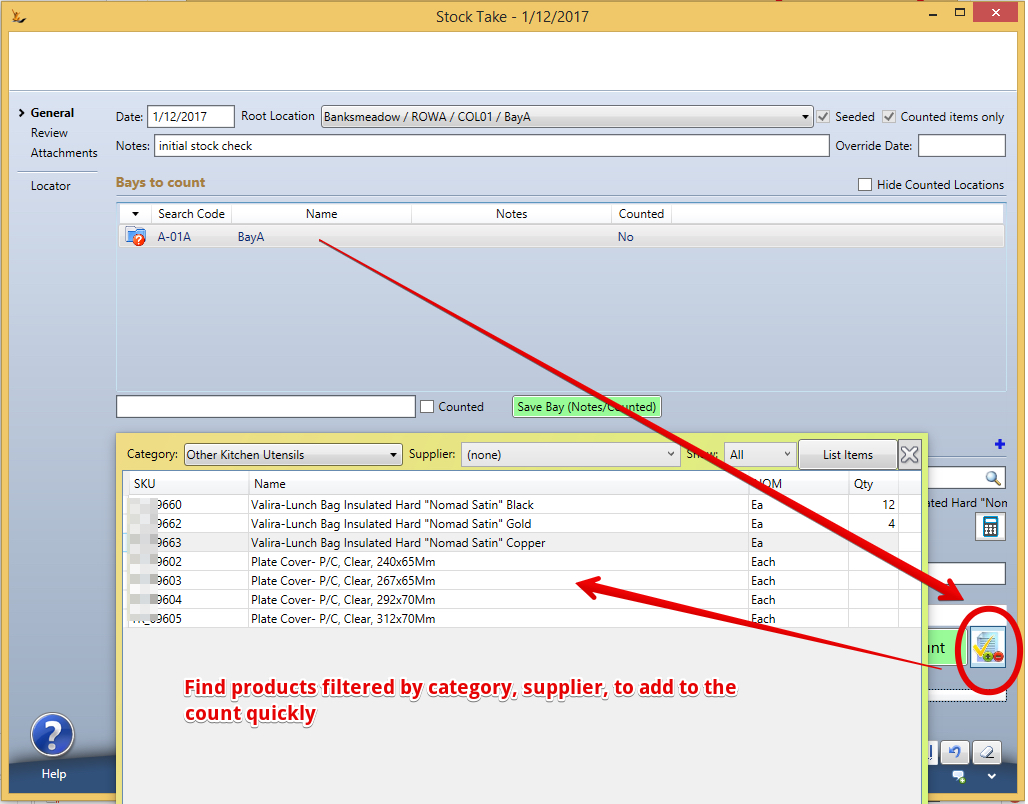
Can mass count items not expected
| Note |
|---|
Barcodes for locations and stock articles can be used to rapidly enter the information - see Setting up Barcode Scanners |
Close first count and start second count
When ready move to second count - a different group may count.
Can update the notes on the overall stocktake or at the bay levell with who counted where
Can copy first count to second count (if you do not plan to do a check count)
Compare 1st count and second count
Anytime while second count is not complete - do a comparison to check any items that require to be check counted

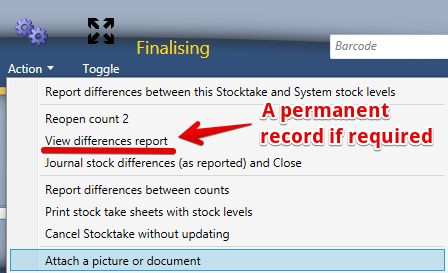
Finalise
You MUST compare count with stock levels to proceed

Can re-open Count 2 and update if want to.
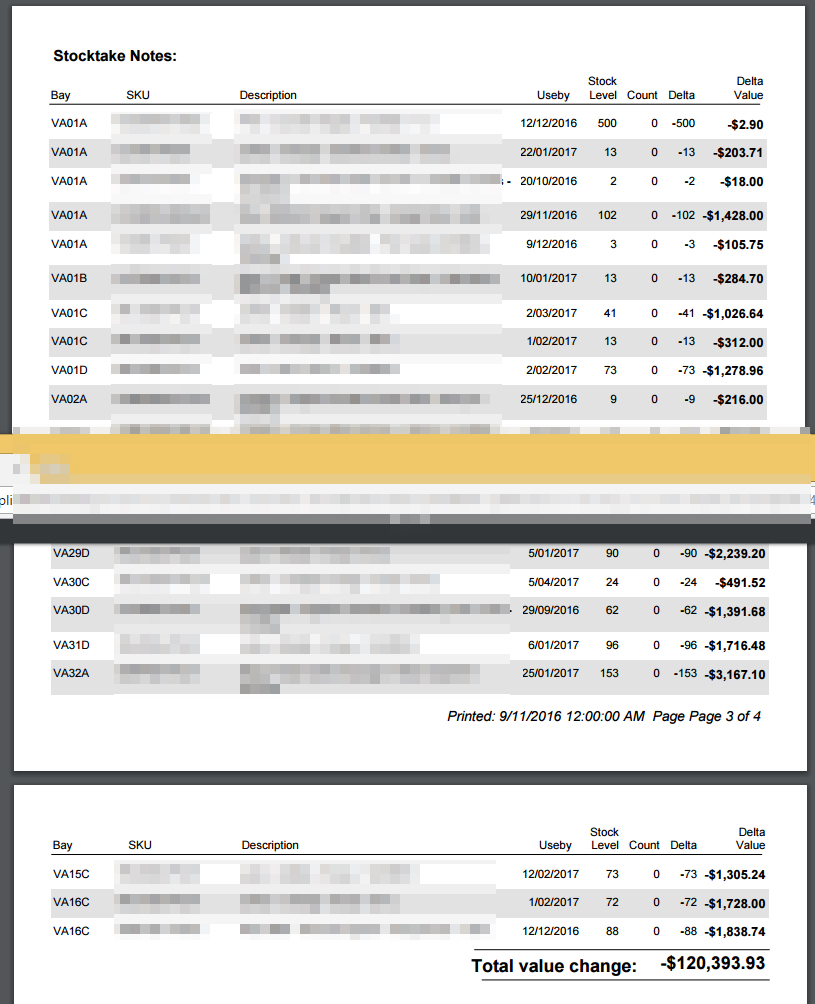
Differences Report - a permanent PDF record of the differences
After compare count with stock levels - a new option appears: The differences report - a PDF report that can be printed and filed - or attached to the stock count as a permanent record of the differences.
| Note |
|---|
The differences report is only available after compare with stock and before journal stock differences |
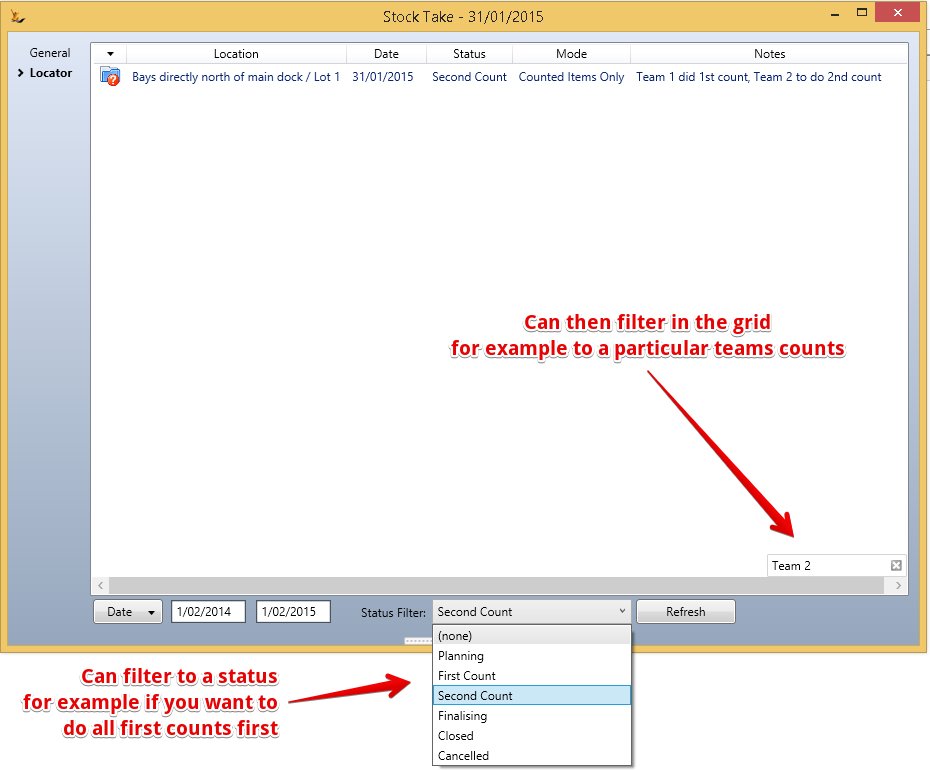
Finder
Finding locations that need a second count during the stocktake (if each location has a separate count)
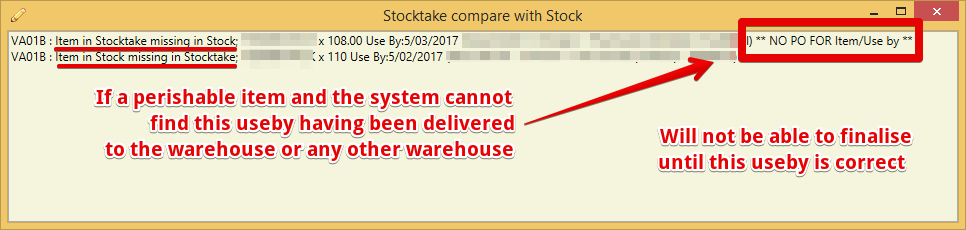
Perishable Items Special Note
| Note | ||
|---|---|---|
| ||
When counting perishable items - a useby date is captured. If the product is a purchased product then for traceability and recall reasons - the expiry date must be one that was received on a Purchase order recently enough not to have expired. The system looks to find any purchase orders that were received into the system and the expiry dates of the items received. The current warehouse is checked first - if not found all warehouses are checked. The system will link the stock to the most recently receipted with that useby. If the system cannot find the useby on any stock receipt - it will not allow the stock to be created by the stocktake. You will see the stock with errors in the comparison with stock list
|
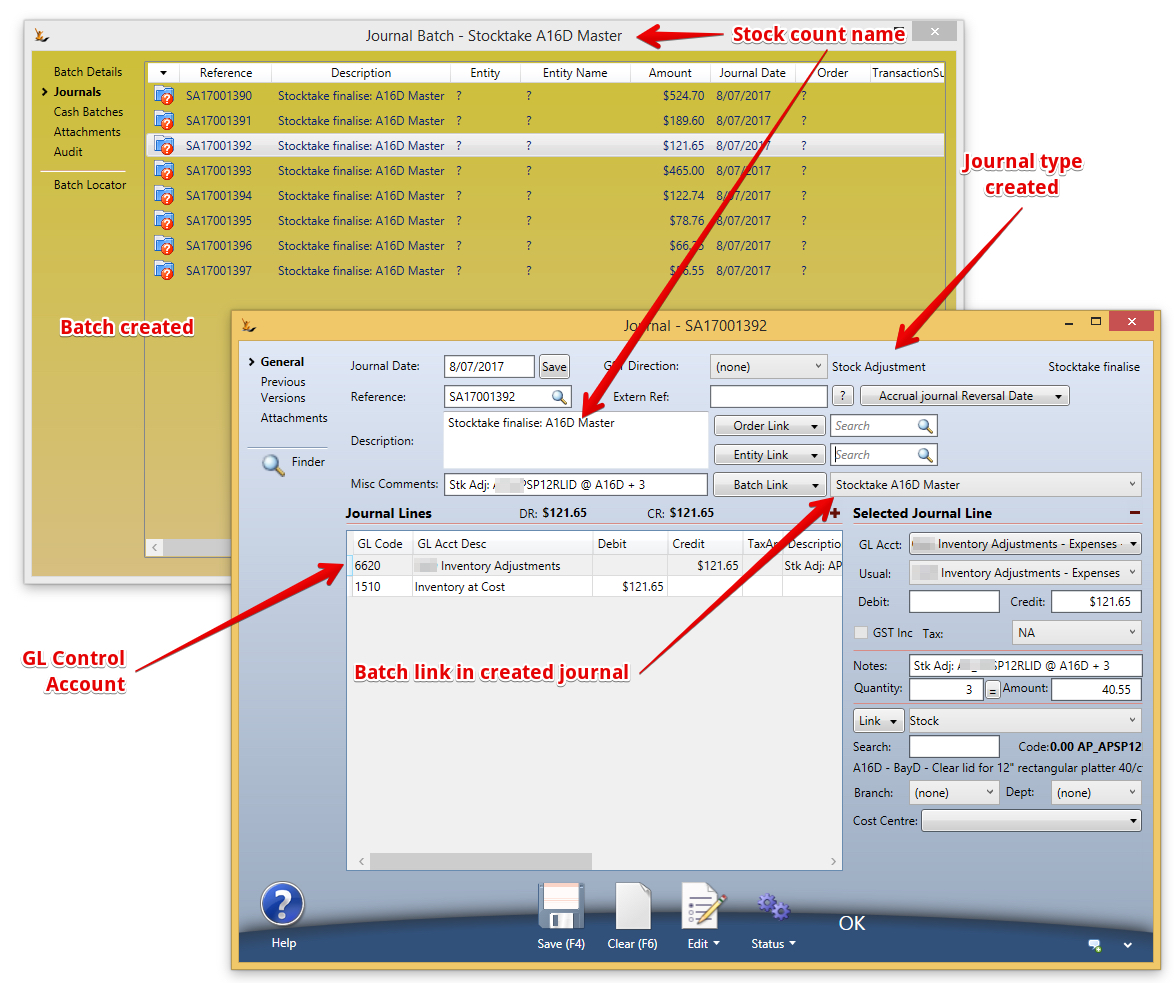
Journal Stock Differences
Will create the required journals for the stock adjustments - the Journal will include the notes from the stocktake screen.
Will place the Journals into a Journal Batch (so they are grouped together) and will close the batch.
| Note |
|---|
Stock take adjustment GL account is configured in Symbols Config as "Stock TakeAdjustmentGLCode" User will require the Secure Feature "Can Record Stock Adjustment" |
Status will become closed.
| Note |
|---|
A stocktake can be cancelled at any time, unless it has a status of Cancelled or Closed, by choosing 'Cancel Stocktake without updating' from the Status/Action menu. |