Table of Contents
Overview
Collecting debt for the organisation involves:
- Reviewing all the companies that are overdue
- Calling them and collecting payments, tracking promises or sending statements
- Putting them onto "Stop Supply" so no products are sent to them (Orders are then placed on hold Automatically)
Some concepts
- Invoices have 3 dates
- Created date
- Invoice Date
- Due Date = (invoice date + Terms)
Trading Terms = % off order OR % off invoice (or both)
Some entities you deal with ask for off invoice trading terms
- Off order - an order discount line will be added to the order and also the invoice
- Off invoice - a separate credit note will be created at the same time the invoice is created - linked to the order
Individual debtors may have linked accounts for trading terms
GL Control account is required for trading terms as a default
For general trading terms see Host Company (your business/s)
Emailing multiple invoices to a customer from their transaction list
Email only open invoices - or all invoices listed based on filter
Multi-select and email
Emailing a statement from the Debtor Transaction List
Statements include a Company wide Statement Note from the Host Company Card
Working down the Aged Debtors List - Collections
On the back of the Customers List is the Aged Debtors Report
Aged Debt ASAT date
To view the report using an ASAT date - adjust the date on the front Debtor Screen
Review Trading Terms (note this company is on Stop Supply)
Trading Terms (Days) are setup on Host Company (your business/s)
Trading Terms (Off Invoice) is a % credit note this company gets on every invoice created.
- The credit note is created at the same time the invoice is
- The credit note is allocated to the invoice (unless the Debtor is ticked "Dont auto-allocate trading terms credits" in Debtor Standard Profile)
Order discount % calculates when the customer purchases an item not on their price list - it applies to the standard sell price
Credit Limit is
Review outstanding debt
From here you can
- email individual invoices
- email all open invoices
- Filter dates to find some invoices and email only those
- Email a statement
- Print an Activity statement based on the filters chosen
- Multi-select (hold down CNTRL or SHIFT) then rightclick to calculate $ amount of selected journals
Review who to talk to on the Debtor
Call and track the conversation / emails via Correspondence on any transaction
From the invoice (it will show in other places)
View Correspondence on the customer - covers all correspondence across all transactions
Entering Payments
There are a number of ways of entering payments into the system
From an invoice - the payment defaults to the invoice amount
From the Debtor
By uploading the bank statement
See Bank Accounts - Creating and Managing#Uploadingthebankstatement-tofindthematchesquickly
Manually - entering multiple payments for the same date
When entering multiple transactions and you do not want to clear some of the choices - select which should not be cleared.
Note that the "Don't Clear Date" option will only show if the date is different to Today
Credit Card Payments using eWay
When using eWay credit card gateway - enter the credit card details in the form and save. The system will pass the information to eWay and await approval before saving the payment.
Credit card numbers are never stored in the system - they are passed to eway or other credit card gateway
eWay payments are batched to simplify the Bank Reconciliation
See also Bank Accounts - Creating and Managing
Credit Card Refunds using eWay
Credit card refunds are not generated by the system - you will need to login to eWay and enter them directly into your eway account. Processing Refunds of credit cards is rare and making this manual is a deliberate policy to reduce the risk of fraud.
Credit Card Payments using separate manual system
After the separate system has processed the transaction and provided a reference number - enter the number in the reference field for later reconciliation
Allocation of Payments to invoices
Crediting an Invoice
To credit a manually created invoice - Action - Credit this invoice.
To credit an invoice that was created by a process (for example pick/pack of stock)
- Rollback the sales order to return stock
- Manually create a single line credit note for the full amount and allocate to the invoice
Credit notes can be created manually if required
Refunds when overpaid
Once a credit note has been raised - or if the customer is in credit - a refund can be created
Create a Refund - link it to the overpayment
Creating a Refund from a Credit Note
The refund will allocate to the credit note
Writing off Small Amounts
There is a maximum write off setting on Host Company
Write off small amounts on Debtor Invoices
That allows users with the secure feature Secure Features List and their impacts to write off small outstanding amounts on invoices. Creates a Debtor Credit note allocated to the Invoice.
Write off small Overpayments from Payments
Creates a Debtor General Journal allocated to the payment.
Sending Statements to Customers
Mass Sending of statements (from Accounts Receivable Dashboard)
Reviewing companies that are overdue
After selecting the filters you want to use - the system will provide a list of all debtors that are overdue based on your filters
Once you have the list - review and contact any you wish to contact - sending them a statement
When ready send statements to all the listed debtors
Once a list of customers is filtered into the AR Dashboard then can send statements out to them all
Track communications on any invoice
On any invoice you can record any promises that are made
Extend the due date on any invoice
if you have the Secure Feature then can adjust the invoice due date regardless of the invoice date.
Statements emailed automatically on the day after invoice due date
The Host Company must have 'Auto email statements' ticked under 'Sales/Credits/Stop Supply' in 'Extended Attributes'.
- The emails will be sent each morning at about 1 am.
- Statements will only be sent to debtors with the Email 'Statement Option' in Additional under 'Extended Attributes' and with an Accounts contact with an email address.
- For a contact to have a role of "Accounts" requires a suitable role to be configured
- Statements will be sent to debtors that have an invoice with a due date of yesterday and that still have an outstanding debt.
Statements that have been emailed will appear in Correspondence
- Emails will be logged in the Correspondence tab of: (see Correspondence Management)
- the debtor
- the Person record of the Accounts contact.
- the employee who initiated the emails.
- The statement will be attached to the email logs.
- The Debtor form has a new Event list on the Orders/Audit tab (the centre list) for:
- The debtor is put on Stop Supply by an action on the Stop Supply tab of the Accounts Receivable form.
- The debtor is taken off Stop Supply by a payment.
- Manual setting or clearing of Stop Supply will show in the Audit list, above the Event list.
- A statement is emailed to the debtor. This will include the source of the email action, which could be:
- Stop supply
- Accounts receivable
- Invoice due
Statement option on debtor - email / print / none
Debtors can be flagged not to receive statements - or only printed statements
Email Template for Statements
The Email template that will be sent to the customers is
Sending statements to multiple debtors - use "Sending Statements and Stop Supply" Accounts Receivable Dashboard
You can send out statements to a few debtors
Or mass send statements
Managing Stop Supply
Stop supply means any sales orders (current or new) will be put onto hold.
There are two ways customers can be put onto stop supply
- Manually on the Debtor (Locked Stop Supply)
- Automatically
- Breaching Credit Limit for the Debtor
- Manually using the Stop Supply Rules in the "Sending Statements and Stop Supply" Accounts Receivable Dashboard
- Amount Outstanding limit will add them to the list
- Days Grace limit - provides some grace days in addition to terms before enacting stop supply.
After putting debtors on Stop Supply a new list will display on the Stop Supply Report tab, showing all debtors processed
- If a debtor was processed but not put on Stop Supply then the Results column will show either:
- 'Skipped', which indicates that they have 'Never Stop Supply' ticked under 'Invoicing Rules' in 'Extended Attributes' on the Debtor form. This replaces the Rating 1 in the Expanz system.
- 'Error', which indicates an error occurred. This should be followed up with Saasplications.
- The Result column will show 'No stmt opt', 'Stmt opt None' or 'Stmt opt Print' if the debtor's 'Statement Option' (under Additional in 'Extended Attributes') is not Email.
- The Result column will show 'No email' if the debtor does not have an Accounts contact with an email address.
- If the Result field is not blank then the Send and Comments fields will be disabled and a statement cannot be emailed.
- Enter text in the Comments field to have this displayed in the email that is sent with the statement attached.
- The email will use the email template with a Usage Context of Debtor and a System Usage of Statement.
- The comments will replace [CreditHoldEmailComments] in the email template HTML area.
- A single statement can be emailed by right clicking on a line and choosing 'Email statement'. The Send box does not need to be ticked.
- A number of statements can be emailed by multi-selecting lines, using Shift + click or Ctrl + click. Only those lines with a blank Result field will be emailed. The Send box does not need to be ticked.
- The Action menu button includes an option to email statements to all of the lines with the Send box ticked.
- The Action menu button includes an option to list all of the debtors put on hold automatically today. This list can be used in the same way as the list generated when the debtors are put on Stop Supply.
Locked Stop Supply
Once the debtor is on Stop Supply - Stop Supply can be locked. Once locked it can only be removed manually. Requires Secure Feature.
Who can be put on stop supply?
Any customer that is overdue can be put onto stop supply
Unless they are flagged as "Never Stop Supply"
Using the Stop Supply Tab (Accounts Receivable Dashboard)
From the Stop Supply Tab you can see lists of customers
List customers who are already on stop supply - or should be on stop supply from here.
List all customers who have not transacted with you - to find organisations that should be Archived
- Grace Days - provides a number of days after invoice due date
- Minimum Amount outstanding reduces stopping supply to your customers with small debts
You may call some customers, change invoice dates etc. to try to remove them from the Stop Supply list
Then can put all the customers listed onto Stop Supply.
- This will put all their orders on hold and any new orders on hold.
- Sales reps entering orders will be warned they are on stop supply.
Which Orders are on Hold
You can find all the orders that are on hold by looking at the sales order list - review and take them off hold (if you have the relevant Secure Feature).
How is Stop Supply Removed
Stop supply can be manually removed (Secure Feature Required)
If a payment is recorded the customer will be taken off stop supply by the system (unless it is locked)
When a debtor is taken off stop supply - the sales rep will receive an automatic email with the subject line "Customer xxxxxxx has been taken off stop supply"
Uploading Large Remittance Advice - eg buying groups
Large customers may email you a remittance advice with the details of how much they are paying of every invoice. Large customers may also have terms that are difficult to define and may even appear arbitrary.
In this case you can upload the remittance advice to the system - match to the invoices involved and decide if you are going to write off the differences or not.
The spreadsheet format
Drag and drop a remittance advice file onto form.
- File must be in xlsx, xls or csv format.
- Reply Yes to 'Upload the following files to the server?'.
- File must have a header row, with 'Invoice Date' in the first column.
- Header row must also have the following values: 'Invoice #', 'Adjustment #', 'Gross Inv $', 'Inv GST $', 'Gross Reb $', 'Reb GST $', 'Net Payment $', 'Branch' and 'SAP Document #'.
- All rows before the header row are ignored.
- Only rows after the header row with a date in the first column are processed.
Use Action Menu - "Match" this file... Result is attempted matches
Notes by column:
- RA ref - highlighted if no match found or if matching journal is for 'other' buying group entity.
- Hover mouse over cell for an explanation of which applies.
- Our ref - will only have a value (highlighted) if a journal with a different reference to the RA ref has been manually matched (see below).
- Our amt - will only have a value (highlighted) if the journal amount does not match RA amt (RA 'Inv Gross $').
- Our open - will only have a value (highlighted) if the journal has been partly allocated.
- Our branch - will only have a value if the journal branch does not match the RA branch.
- Our date - will only have a value if the journal date does not match the RA date.
Audit trail of changes on Journals
Each Journal has a view of what it looked like before it was changed
Search across journals to find changes made
Settings
Settings - Debtor Terms (Host Company)
Trading Terms for customer ROG (Receipt of Goods) applies only to export orders. If these terms apply then payment will be due the number of days after the order Expected Delivery date.
Settings - Writing off Small Amounts (Host Company)
Archiving Debtors - From "Collect Only" to "Archive"
Table of Contents
When a Debtor ceases to trade or you decide you will no longer trade with them you can remove them from lists in the system by Archiving them.
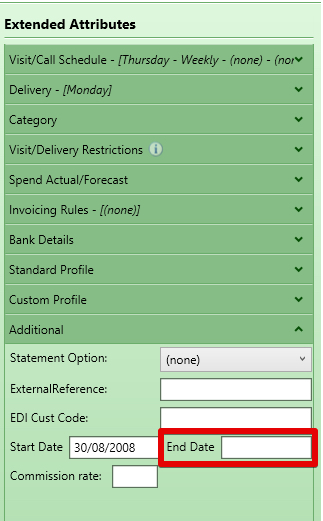
To Archive a debtor is to enter and end date.
If the Debtor still owes you money the status will be "Collect Only" until the debt is collected or written off.
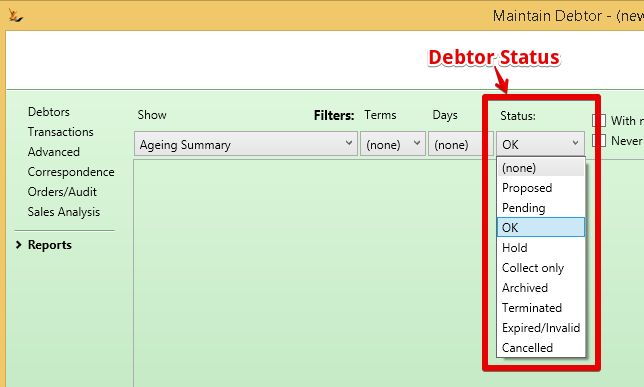
You can search for debtors at different statuses using the filter on the Reports tab
End Dating a Debtor
An end date can be:
- In the future - you know when they will stop trading
- A warning will show on Sales Orders
- A warning will show when the Debtor is Retrieved in the Debtor form
- In the past - you are cleaning up
- immediately changes the debtor status to "Collect Only" if they owe money
- Sets Stop Supply on
- Changes the status to "Archived" if their is no outstanding debt - or when the debt is has been paid
- Current date
End Date can only be set by a user with Secure Feature Can Maintain Archived Debtor
Removing an end date is done from the Status Menu and can only be done by a user with Secure Feature "Can Maintain Archived Debtor"
- Debtor will remain on Hold when end date has been removed. See Managing Stop Supply to remove.
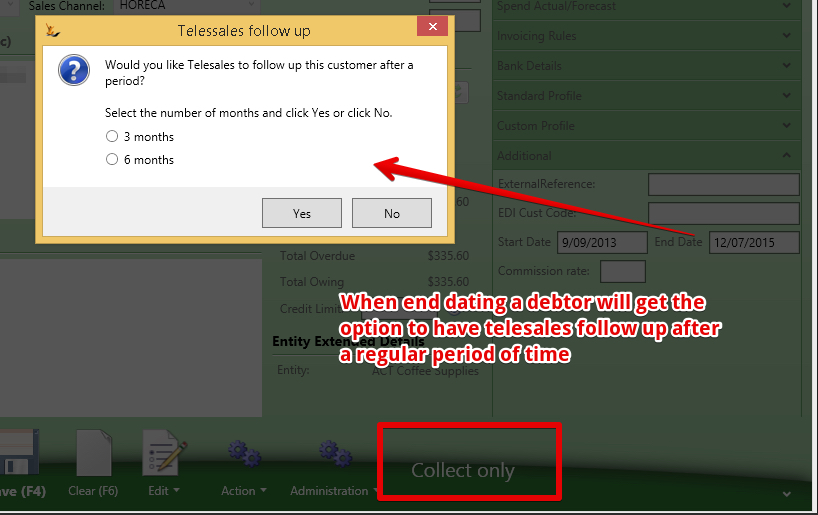
Telesales Followup
Sometimes you would like to win the debtor back as a customer and stay in touch - create a telesales followup
A followup call will be created for the Telesales Dashboard
Collect Only Status
Collect Only indicates that no orders can be shipped and no returns processed.
- Orders can be entered - however they will go on hold
- Returns cannot be Submitted or Confirmed
Allowed Journals
- Debtor Payment
- Debtor Credit Note
- Debtor General Journal (if user has Secure Feature "Can Maintain Archived Debtors")
Users with secure feature "Can Maintain Archived Debtors" can:
- Choose a different sales rep or none in the dropdown and use the menu > Actions > Status > Update Sales Rep
- Re-instate a debtor from Collect Only status
Archived Status
Archived Debtors are not visible in the system normally
Users with Secure Feature "Can Maintain Archived Debtors"
- Can find and view Archived Debtors
- Can use the Actions menu to re-instate from Archive
- Can chose a different sales rep (or none) from the dropdown list - then menu > Actions > Status > Update Sales Rep
No Changes can be saved to Archived Debtors
Orders cannot be Submitted, Authorised or removed from hold
To change the status of an Archived Debtor - user must have the secure feature
Reverting to Lead Status
A debtor from any status can be reverted to a lead status. Normally this might ocour if they have been dormant for a while
- Status menu option to 'Revert Debtor to Lead' offered if user 'Can maintain debtor terms', debtor has OK status and no debt.
- 'Revert Debtor to Lead' will be rejected if debtor has any sales orders authorised but not yet delivered.
- 'Revert Debtor to Lead' will set debtor Stop Supply on and Hold any sales orders in Plan status.


