Use Sidebar LHS to navigate
For global help click here
1. Creating the Web Application
This chapter will guide you through the process of creating an ASP.NET web application which is configured with the Genie JavaScript SDK and its associated requirements.
Creating the Solution in Visual Studio
- Create a new project in Visual Studio 2019, using the ASP.NET Web Application (.NET Framework) project template:
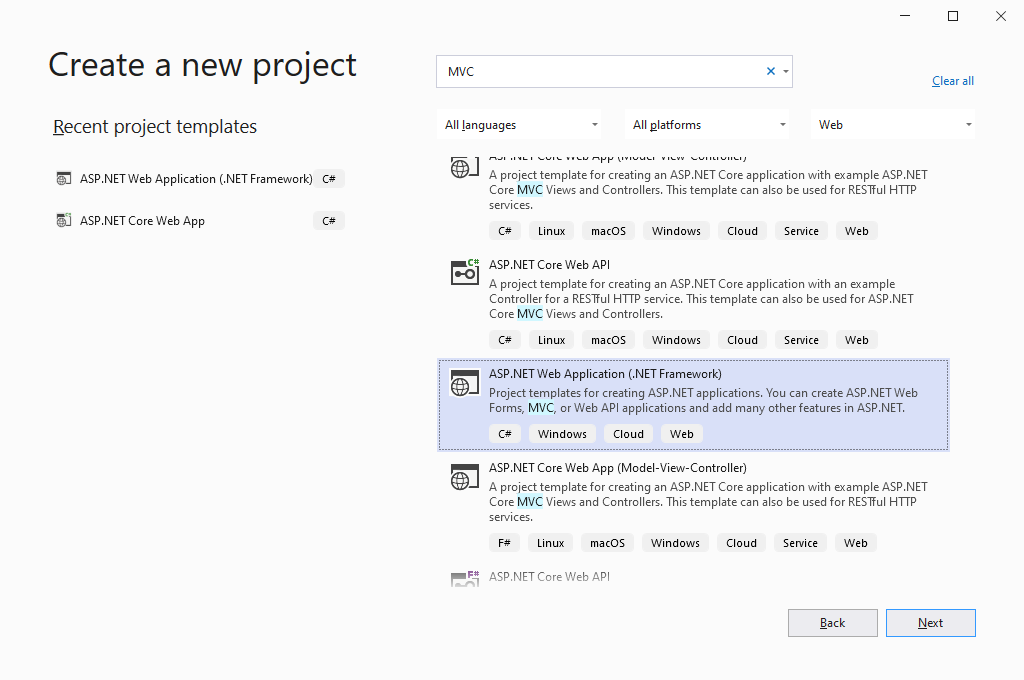
- Click Next.
- Enter the details of the specific web application that you are creating:
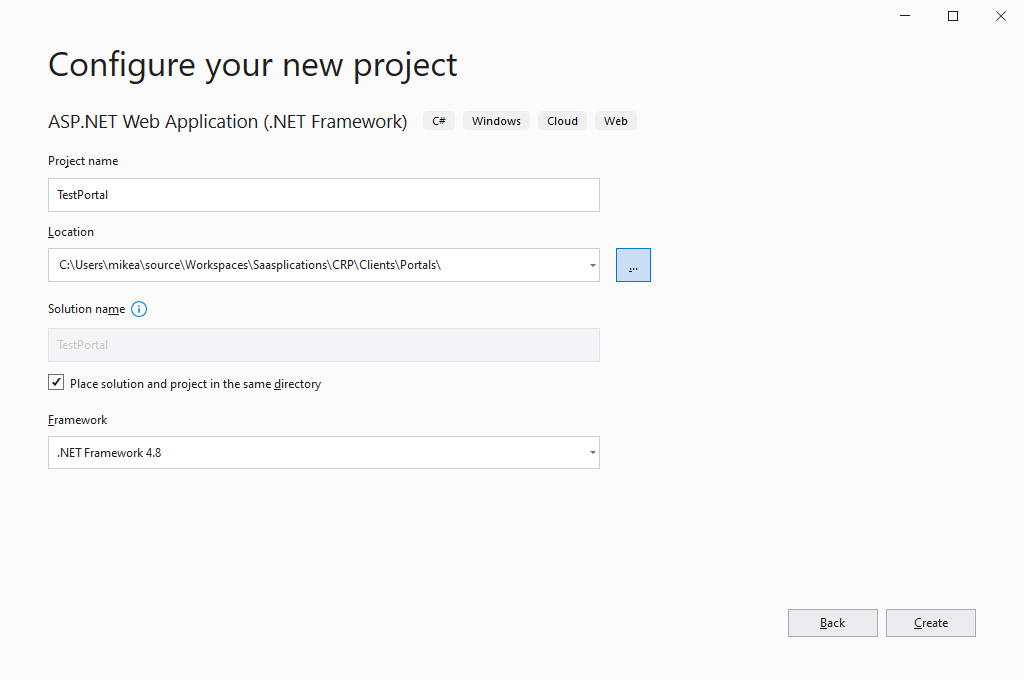
- Click Create.
- In the next dialog that appears, select the MVC template:
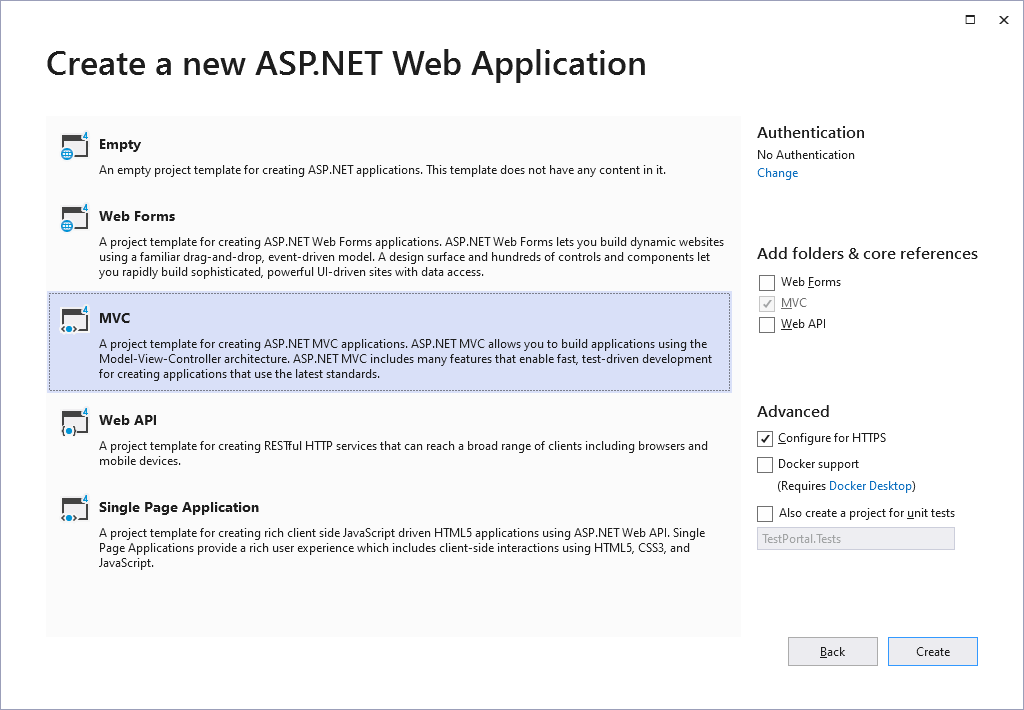
- Click Create.
- You can delete the App_Data and Models folders from the project, as they are not required.
- Under the Controllers folder, delete the HomeController.cs class.
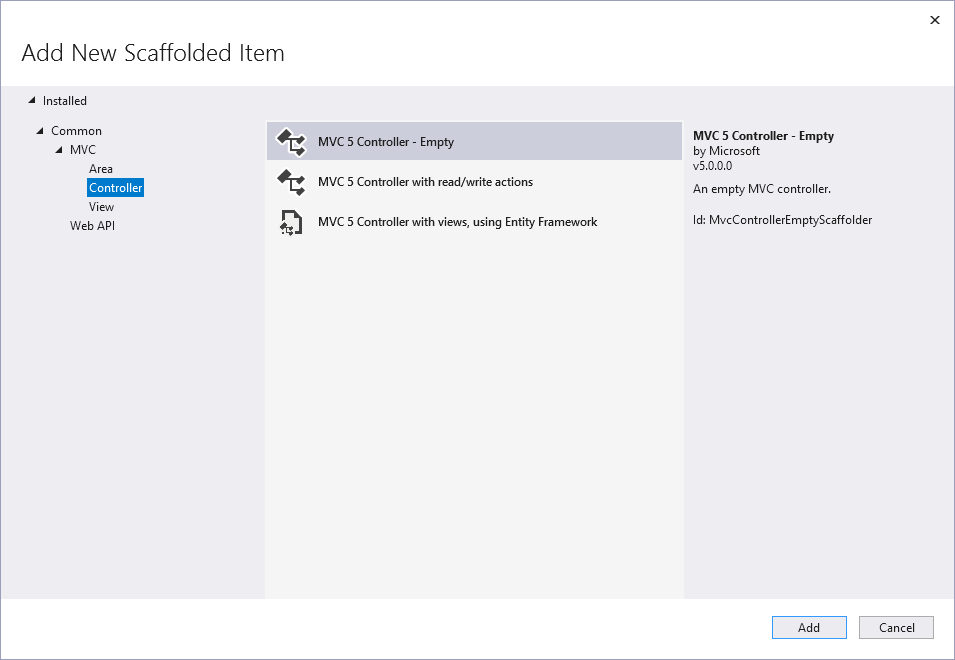
- Add a new controller to the Controllers folder in your project, named AppController. Use the MVC 5 Controller - Empty template:
- Delete the Home folder within the Views folder and ensure that we have an App and Shared folder within the Views folder..
Update the _ViewStart under the Views folder so that it contains the following code:
@{ Layout = "~/Views/Shared/_Layout.cshtml"; }- Add any required views under the Views\App folder. For example Login, Home, Maintenance is probably the minimum required to start with. When adding these views, ensure you add a view (MVC 5 View):
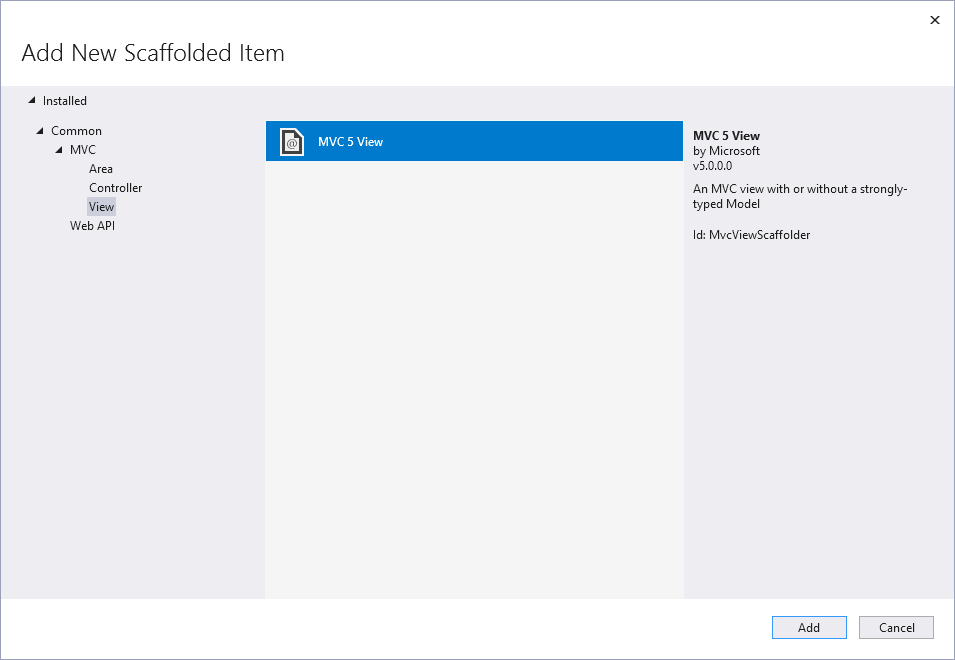
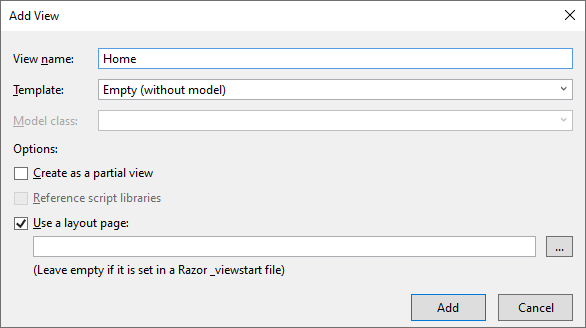
- When you click Add, ensure that:
- You click New Scaffolded Item...
- You set the correct view name
- You set the template to Empty (without model)
- The Use a layout page checkbox is selected - you can leave the text box empty as the layout page is set by Razor.
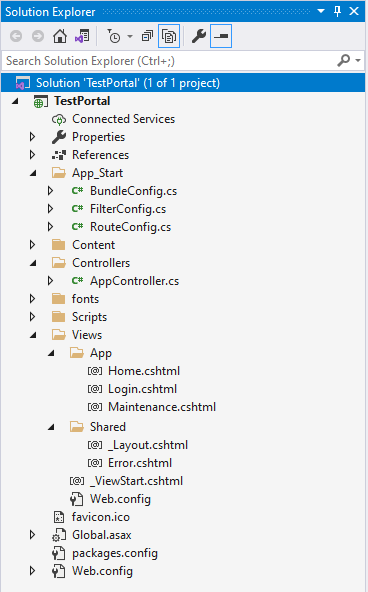
- Your project should now look like this:
We now need to point the AppController to the views you added above, and redirect the Index action to redirect to the Login view. The code for this class is as follows:
using System.Web.Mvc;

namespace TestPortal.Controllers
{
    public class AppController : Controller
    {
        protected override void HandleUnknownAction(string actionName)
        {
            ViewEngineResult viewEngineResult = ViewEngines.Engines.FindView(ControllerContext, actionName, null);
            if (viewEngineResult.View != null)
                this.View(actionName).ExecuteResult(this.ControllerContext);
            else
                RedirectToAction("Login").ExecuteResult(this.ControllerContext);
        }
    }
}
Next we need to configure the routing to suit our needs. Open the RouteConfig.cs file, found under the App_Start folder, and change the default route mapping to this:
routes.MapRoute( name: "Default", url: "{action}", defaults: new { controller = "app", action = "Index" } );- You should now be able to compile and run the project. You should see a page appear with the text “Login” in large letters.
Importing the Genie JavaScript SDK into your Project
The next step is to get the JavaScript files and dependencies required by the Genie JavaScript SDK into your project.
There are three main ways you can do this:
- Referencing the existing SDK location and using virtual folders to reference an existing location (this is the preferred option as it allows for SDK changes to be made in place), or
- Using the NuGet package (you would need to generate your own NuGet package), or
- Manually
Which method you should use will depend on your scenario. We’ll look at each of these methods in turn, and you can choose the method that best suits your needs.
Referencing the Existing SDK Location Using Virtual Folders
If you have the SDK in a separate project, then you can set up some virtual folders to point towards this project. This is particularly useful if you are modifying the SDK source, and committing back to the GitHub source repository.
First, just add the SDK project to your current solution by right-clicking the solution and Add→Existing Project... Then select the SDK project within your file system and click Open. Then add a project reference to the SDK within the web application project. To do this, right click on the web applications References node and select Add Reference... Under the Projects tab, select the SDK project.
You will need to configure two virtual folders that are required under the Scripts folder in your project (create one if you don’t already have one):
- A virtual folder named genie-sdk needs to point to the source\js folder under the SDK.
- A virtual folder named genie-sdk-min needs to point to the build folder under the SDK.
If you’re debugging under IIS, then you can configure these virtual folders in the IIS Management Console.
However, if you’re debugging under IIS Express, you will need to edit your site’s settings and configure these virtual folders in the applicationhost.config file, found in a subfolder of the solution folder:
$(solutionDir)\.vs\{projectName}\config\applicationhost.config
In this file you will find a site with the same name as your project that Visual Studio will have automatically created for you. It will already have a virtual folder defined, and you'll need to add the following elements in addition to the existing one:
<virtualDirectory path="/Scripts/genie-sdk" physicalPath="C:\Projects\GitHub\genie-JavaScript-SDK\source\js" />
<virtualDirectory path="/Scripts/genie-sdk-min" physicalPath="C:\Projects\GitHub\genie-JavaScript-SDK\build" />
Change C:\Projects\GitHub in the physicalPath attribute to point towards the location of the SDK. Save and close this file.
Note: As per adding the scripts manually to your project, you will also need to add the dependencies to your project under the Scripts\lib folder.
Using NuGet
The easiest way to get your project set up with the Genie JavaScript SDK and its dependencies is by using the NuGet package we provide. The steps to do so are as follows:
- Ensure you have the NuGet Package Manager installed. This is a Visual Studio extension, which you can install by opening the Extension Manager in Visual Studio (TOOLS > Extensions and Updates), selecting Online from the left side bar, and searching for NuGet Package Manager in the list (it should be one of the top items). Select the item, and click the Download button.
- Once you’re set up with NuGet, we can install the JavaScript SDK for the expanzPLATFORM (Source) package. Currently, this package is not available in the official Microsoft NuGet repository, therefore you will need to point the package manager towards its location. To do so, select TOOLS > Library Package Manager > Package Manager Settings from the menu in Visual Studio. Select the Package Sources item from the tree on the left. Add a new package source, give it a name, and point it to the location on disk where you have previously downloaded the Genie JavaScript SDK NuGet package files (*.nupkg). Close the window.
- Right-click on your project in the Solution Explorer in Visual Studio, and select Manage NuGet Packages... from the context menu. Select the source that you created in the previous step (with the name that you gave it) from the left side bar. The packages in this location should appear in the list. Select the package titled JavaScript SDK for the expanzPLATFORM (Source), and click the Install button. Alternatively, if you don’t want the source for the SDK, select the JavaScript SDK for the expanzPLATFORM package instead.
The package will begin to install. It was also download its dependencies, some of which will show a license dialog. Click I Accept on these.
A Scripts folder will be created in your project, and look like this:
As you can see, the dependencies and bundled/minified SDK can be found directly under the Scripts folder. The source for the SDK is under the Scripts\Genie folder.
Note: These dependencies aren’t actually required to be in your project if you want to use their CDN hosted versions, as we will be demonstrating shortly.
Manual
Alternatively, you can manually add the files from the source of the SDK to your project. We will not detail this process intimately, but the basic concept is as follows:
- All the files from the source\js folder under the SDK should go under a Scripts\genie-sdk folder in your project.
- All the files from the build folder under the SDK should go under a Scripts\genie-sdk-min folder in your project.
Note: When using this method, you will also need to add some of the SDK’s dependencies to your project.
Required NuGet Packages
Using the NuGet Package Manager, ensure that you have the following packages installed. The versions listed are those tested to work at the time of writing, however newer package versions may also work, but will need to be tested to ensure compatibility.
Note: Please ensure you upgrade the version of underscore.js to at least version 1.8.3. The version installed by default (1.5.1) is an older release which does not work.
| NuGet Package | Version |
|---|---|
| Antlr | 3.5.0.2 |
| Backbone.js | 1.3.3 |
| bootstrap | 3.4.1 |
| FontAwesome | 4.7.0 |
| jQuery | 3.6.0 |
| jQuery.Validation | 1.19.3 |
| Microsoft.AspNet.Mvc | 5.2.7 |
| Microsoft.AspNet.Razor | 3.2.7 |
| Microsoft.AspNet.Web.Optimization | 1.1.3 |
| Microsoft.AspNet.WebPages | 3.2.7 |
| Microsoft.CodeDom.Providers.DotNetCompilerPlatform | 2.0.1 |
| Microsoft.jQuery.Unobtrusive.Validation | 3.2.11 |
| Microsoft.Web.Infrastructure | 1.0.0 |
| Modernizr | 2.8.3 |
| Newtonsoft.Json | 12.0.2 |
| underscore.js | 1.8.3 |
| WebGrease | 1.6.0 |
Optional Nuget Packages
| NuGet Package | Version |
|---|---|
| jQuery.UI.Combined | 1.12.1 |
| toastr | 2.1.1 |
Configuring the CSS and JavaScript Bundles
To optimise the delivery of CSS and JavaScript, you can create any number of bundles to use throughout the web application.
An example of a fairly typical BundleConfig.cs file:
	public class BundleConfig
    {
        // For more information on bundling, visit https://go.microsoft.com/fwlink/?LinkId=301862
        public static void RegisterBundles(BundleCollection bundles)
        {
            // CSS
            bundles.Add(new StyleBundle("~/Content/css").Include(
                "~/Content/bootstrap.css",
                "~/Content/site.css"));

            // Scripts
            bundles.Add(new ScriptBundle("~/bundles/jquery").Include(
            "~/Scripts/jquery-{version}.min.js"));

            bundles.Add(new StyleBundle("~/bundles/css/app").Include(
                "~/Content/css/app.css"));

            bundles.Add(new ScriptBundle("~/bundles/App").Include(
                "~/Scripts/App/Common.js",
                "~/Scripts/App/MessageKeyLookup.js"));

            bundles.Add(new ScriptBundle("~/bundles/bootstrap").Include(
                "~/Scripts/bootstrap.js"));

            bundles.Add(new ScriptBundle("~/bundles/ThirdPartyScripts").Include(
                "~/Scripts/App/app.config.js",
                "~/Scripts/modernizr-2.8.3.js",
                "~/Scripts/underscore.js",
                "~/Scripts/backbone.js",
                "~/Scripts/jquery-ui-1.12.1.js",
                "~/Scripts/App/app.min.js"));

        }
    }
These bundles can then be referenced from the _Layout.cs or from any master pages.
Configuring the Required JavaScript References
You now need to reference the SDK’s JavaScript files and its dependencies in the master (i.e. layout) page, _Layout.cshtml. The recommended approach is to create an empty view under the Views/Shared folder named ScriptReferences.cshtml (deselect Use a layout page when creating the view). Then add references to all of the required JavaScript libraries to this file. Once you have all of the references defined, you then reference the ScriptReferences.cshtml file from within the _Layout.cshtml file. Keeping the script references separate in this way allows for easier maintenance of both the script references and the site layout.
Note: This code is using the ASP.NET razor engine to send the source files to the client if in debug mode, and the bundled/minified files to the client in release mode. This allows you to easily debug the source of the SDK when developing, but use the “compiled” version when in production.
Warning: The SDK is under constant development. This list of scripts is current at the 28th of July, 2021, but may be out of date at the time you read this. Check the README file in the SDK for the latest script listing.
Here is a typical example of a ScriptReferences.cshtml file:
@using System.Web.Optimization

@* Bundle defined in BundleConfig.cs *@
@Scripts.Render("~/bundles/ThirdPartyScripts")

<script type="text/javascript" src="~/Scripts/bootstrap.min.js"></script>
<script type="text/javascript" src="~/Scripts/app/pingTest.js"></script>

@if (Context.IsDebuggingEnabled)
{
    <script type="text/javascript" src="./Scripts/genie-sdk/genie/genie.config.js"></script>
    <script type="text/javascript" src="./Scripts/genie-sdk/genie/genie.collection.js"></script>
    <script type="text/javascript" src="./Scripts/genie-sdk/genie/genie.component.js"></script>
    <script type="text/javascript" src="./Scripts/genie-sdk/genie/genie.factory.js"></script>
    <script type="text/javascript" src="./Scripts/genie-sdk/genie/genie.html.js"></script>

    <script type="text/javascript" src="./Scripts/genie-sdk/genie/models/genie.models.Bindable.js"></script>
    <script type="text/javascript" src="./Scripts/genie-sdk/genie/models/genie.models.Field.js"></script>
    <script type="text/javascript" src="./Scripts/genie-sdk/genie/models/genie.models.CustomContent.js"></script>
    <script type="text/javascript" src="./Scripts/genie-sdk/genie/models/genie.models.DashboardField.js"></script>
    <script type="text/javascript" src="./Scripts/genie-sdk/genie/models/genie.models.DataPublication.js"></script>
    <script type="text/javascript" src="./Scripts/genie-sdk/genie/models/genie.models.Method.js"></script>
    <script type="text/javascript" src="./Scripts/genie-sdk/genie/models/genie.models.MenuAction.js"></script>
    <script type="text/javascript" src="./Scripts/genie-sdk/genie/models/genie.models.ContextMenu.js"></script>
    <script type="text/javascript" src="./Scripts/genie-sdk/genie/models/genie.models.Login.js"></script>
    <script type="text/javascript" src="./Scripts/genie-sdk/genie/models/genie.models.Dashboards.js"></script>
    <script type="text/javascript" src="./Scripts/genie-sdk/genie/models/genie.models.Message.js"></script>
    <script type="text/javascript" src="./Scripts/genie-sdk/genie/models/genie.models.MessageCollection.js"></script>
    <script type="text/javascript" src="./Scripts/genie-sdk/genie/models/genie.models.Activity.js"></script>
    <script type="text/javascript" src="./Scripts/genie-sdk/genie/models/genie.models.ClientMessage.js"></script>
    <script type="text/javascript" src="./Scripts/genie-sdk/genie/models/genie.models.ProcessMap.js"></script>
    <script type="text/javascript" src="./Scripts/genie-sdk/genie/models/genie.models.QuickLinks.js"></script>
    <script type="text/javascript" src="./Scripts/genie-sdk/genie/models/genie.models.Wizard.js"></script>

    <script type="text/javascript" src="./Scripts/genie-sdk/genie/models/data/genie.models.data.Cell.js"></script>
    <script type="text/javascript" src="./Scripts/genie-sdk/genie/models/data/genie.models.data.Row.js"></script>

    <script type="text/javascript" src="./Scripts/genie-sdk/genie/genie.net.js"></script>
    <script type="text/javascript" src="./Scripts/genie-sdk/genie/client/requestBuilder.js"></script>
    <script type="text/javascript" src="./Scripts/genie-sdk/genie/client/requestBody.js"></script>
    <script type="text/javascript" src="./Scripts/genie-sdk/genie/client/responseParser.js"></script>
    <script type="text/javascript" src="./Scripts/genie-sdk/genie/client/serverRequestManager.js"></script>

    <script type="text/javascript" src="./Scripts/genie-sdk/genie/genie.storage.js"></script>
    <script type="text/javascript" src="./Scripts/genie-sdk/genie/genie.util.js"></script>

    <script type="text/javascript" src="./Scripts/genie-sdk/genie/views/genie.views.BaseView.js"></script>
    <script type="text/javascript" src="./Scripts/genie-sdk/genie/views/genie.views.FieldView.js"></script>
    <script type="text/javascript" src="./Scripts/genie-sdk/genie/views/genie.views.DataFieldView.js"></script>
    <script type="text/javascript" src="./Scripts/genie-sdk/genie/views/genie.views.VariantFieldView.js"></script>
    <script type="text/javascript" src="./Scripts/genie-sdk/genie/views/genie.views.EnumCollectionFieldView.js"></script>
    <script type="text/javascript" src="./Scripts/genie-sdk/genie/views/genie.views.FileUploadFieldView.js"></script>
    <script type="text/javascript" src="./Scripts/genie-sdk/genie/views/genie.views.ApportionableFieldView.js"></script>
    <script type="text/javascript" src="./Scripts/genie-sdk/genie/views/genie.views.ImageFieldView.js"></script>
    <script type="text/javascript" src="./Scripts/genie-sdk/genie/views/genie.views.DependantFieldView.js"></script>
    <script type="text/javascript" src="./Scripts/genie-sdk/genie/views/genie.views.MethodView.js"></script>
    <script type="text/javascript" src="./Scripts/genie-sdk/genie/views/genie.views.MessagesView.js"></script>
    <script type="text/javascript" src="./Scripts/genie-sdk/genie/views/genie.views.ContextMenuView.js"></script>
    <script type="text/javascript" src="./Scripts/genie-sdk/genie/views/genie.views.ChangePasswordView.js"></script>
    <script type="text/javascript" src="./Scripts/genie-sdk/genie/views/genie.views.DataPublicationView.js"></script>
    <script type="text/javascript" src="./Scripts/genie-sdk/genie/views/genie.views.CustomContentView.js"></script>
    <script type="text/javascript" src="./Scripts/genie-sdk/genie/views/genie.views.LoginView.js"></script>
    <script type="text/javascript" src="./Scripts/genie-sdk/genie/views/genie.views.MainMenuView.js"></script>
    <script type="text/javascript" src="./Scripts/genie-sdk/genie/views/genie.views.ActivityView.js"></script>
    <script type="text/javascript" src="./Scripts/genie-sdk/genie/views/genie.views.PopupView.js"></script>
    <script type="text/javascript" src="./Scripts/genie-sdk/genie/views/genie.views.PicklistWindowView.js"></script>
    <script type="text/javascript" src="./Scripts/genie-sdk/genie/views/genie.views.UIMessage.js"></script>
    <script type="text/javascript" src="./Scripts/genie-sdk/genie/views/genie.views.QuickLinksView.js"></script>
    <script type="text/javascript" src="./Scripts/genie-sdk/genie/views/genie.views.WizardView.js"></script>

    <script type="text/javascript" src="./Scripts/genie-sdk/genie/views/subviews/genie.views.subviews.DataPublicationHeaderView.js"></script>
    <script type="text/javascript" src="./Scripts/genie-sdk/genie/views/subviews/genie.views.subviews.DataPublicationBodyView.js"></script>
    <script type="text/javascript" src="./Scripts/genie-sdk/genie/views/subviews/genie.views.subviews.DataPublicationRowView.js"></script>
    <script type="text/javascript" src="./Scripts/genie-sdk/genie/views/subviews/genie.views.subviews.DataPublicationPagingBarView.js"></script>
    <script type="text/javascript" src="./Scripts/genie-sdk/genie/views/subviews/genie.views.subviews.DataPublicationBodyView.js"></script>
    <script type="text/javascript" src="./Scripts/genie-sdk/genie/views/subviews/genie.views.subviews.MenuItemView.js"></script>
    <script type="text/javascript" src="./Scripts/genie-sdk/genie/views/subviews/genie.views.subviews.ContextMenuItemView.js"></script>

    <script type="text/javascript" src="./Scripts/genie-sdk/genie/genie.security.js"></script>
    <script type="text/javascript" src="./Scripts/genie-sdk/genie/genie.js"></script>

    <script type="text/javascript" src="./Scripts/genie-sdk/adapters/BootstrapWindowAdapter.js"></script>
    <script type="text/javascript" src="./Scripts/genie-sdk/adapters/jQueryUIDatePickerAdapter.js"></script>
    <script type="text/javascript" src="./Scripts/genie-sdk/adapters/TimeInputAdapter.js"></script>
    <script type="text/javascript" src="./Scripts/genie-sdk/adapters/BreadcrumbAdapter.js"></script>
    <script type="text/javascript" src="./Scripts/genie-sdk/adapters/ShapedDataPublicationAdapter.js"></script>
    <script type="text/javascript" src="./Scripts/genie-sdk/adapters/FuelUXWizardAdapter.js"></script>
}
else
{
    <script type="text/javascript" src="./Scripts/genie-sdk/genie-sdk.min.js"></script>
}
If you are using KendoUI in your client application, and want to use the predefined KendoUI adapters, add the following code to your page.
	<script type="text/javascript" src="//da7xgjtj801h2.cloudfront.net/2012.2.913/js/kendo.all.min.js"></script>

    @if (Context.IsDebuggingEnabled)
    {
    <script type="text/javascript" src="~/Scripts/genie-sdk/adapters/KendoAdapter.js"></script>
    <script type="text/javascript" src="~/Scripts/genie-sdk/adapters/KendoComboBoxAdapter.js"></script>
    <script type="text/javascript" src="~/Scripts/genie-sdk/adapters/KendoDropDownListAdapter.js"></script>
    <script type="text/javascript" src="~/Scripts/genie-sdk/adapters/KendoFileUploadAdapter.js"></script>
    <script type="text/javascript" src="~/Scripts/genie-sdk/adapters/KendoMobileListAdapter.js"></script>
    <script type="text/javascript" src="~/Scripts/genie-sdk/adapters/KendoPanelBarAdapter.js"></script>
    <script type="text/javascript" src="~/Scripts/genie-sdk/adapters/KendoPopupWindowAdapter.js"></script>
    <script type="text/javascript" src="~/Scripts/genie-sdk/adapters/KendoTabStripAdapter.js"></script>
    <script type="text/javascript" src="~/Scripts/genie-sdk/adapters/KendoTreeAdapter.js"></script>
    <script type="text/javascript" src="~/Scripts/genie-sdk/adapters/KendoDatePickerAdapter.js"></script>
    <script type="text/javascript" src="~/Scripts/genie-sdk/adapters/KendoTimePickerAdapter.js"></script>
    }
    else
    {
    <script type="text/javascript" src="~/Scripts/genie-sdk-min/genie-kendoui-adapters.min.js"></script>
    }
Note: The reference paths provided are those required when referencing an existing SDK location using folders. If you’ve used the NuGet package to import the files into your project, you will need to adjust the source paths slightly to where they’ve been placed in your project.
Configuring the Required CSS References
Similar to what we did in the previous section for JavaScript references, we will now add any required CSS references to a CSSReferences.cshtml view that we can create under Views/Shared.
Here is a typical example of a CSSReferences.cshtml file:
@using System.Web.Optimization

<link href="~/Content/bootstrap.min.css" rel="stylesheet" />
<link href="~/Content/css/font-awesome.min.css" rel="stylesheet" />
<link href="~/Content/css/smartadmin-production.min.css" rel="stylesheet" />
<link href="~/Content/css/smartadmin-production-plugins.css" rel="stylesheet" />
<link href="~/Content/css/smartadmin-skins.min.css" rel="stylesheet" />
<link rel="stylesheet" type="text/css" href="~/Content/css/Genie.css" />
<link rel="stylesheet" type="text/css" href="~/Content/css/Site.css" />
@Styles.Render("~/bundles/css/app")
Updating the _Layout.cshtml to Include References
Open the _Layout.cshtml file and ensure that the <head> element contains the following references:
    @Html.Partial("CSSReferences")
    @Scripts.Render("~/bundles/jquery")
Note: I have found it necessary to add the jQuery reference separately as above within the <head> section rather than adding it to the ScriptReferences.cshtml file.
And within the <body> element, ensure that it includes the following reference:
@Html.Partial("ScriptReferences")
Creating the Service Proxy
You now need to create a HTTP handler to act as a proxy between the client and the ESA web service. This is because if the JavaScript were to communicate with the ESA web service directly, it would be attempting to do so across domains, and would fail. Instead, the JavaScript will post requests to this HTTP handler, which will forward them to the ESA web service.
You can create the HTTP handler by following these instructions:
- To add the proxy to your project, right-click your web application project and select Add→New Item. Then select Generic Handler and give it the name GenieProxy.ashx.
- In your project tree, delete the GenieProxy.ashx.cs file as it is not required.
Open the GenieProxy.ashx file and ensure that it contains the following code:
<%@ WebHandler Language="C#" Class="Genie.Web._GenieProxy" %>
- Your project should successfully compile.
Note: The Genie JavaScript SDK will post XML to this HTTP handler. However, ASP.NET will detect XML as a potentially dangerous payload, and throw an exception. In order for this HTTP handler to accept the posted XML, you will need to turn off the validation in the Web.config file. How to do so will be discussed in the following section.
Configuring the Web.config File
This section will detail some additions to your Web.config file that you will need for everything to work correctly with the Genie JavaScript SDK.
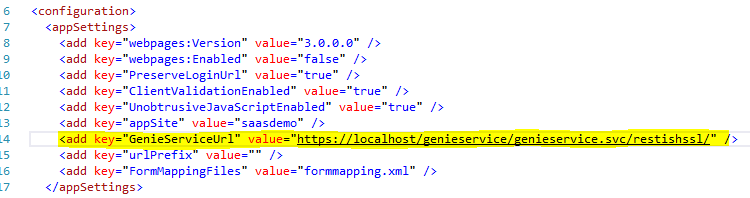
Specify the Genie URL
For the client to be able to communicate with the server, you need to provide the correct URL for the Genie service. For example:
Mime Type Mappings
In order for IIS to serve up files with the .properties extension (used for message text conversion/transformation), you need to add the .properties extension to your root web.config file as a "text/plain" mime type. Also, to correctly handle web fonts, it is recommended to include the remapping of .woff2 files. The recommended mime mappings are shown below:
<configuration>
  <system.webServer>
    <staticContent>
      <mimeMap fileExtension=".properties" mimeType="text/plain" />
      <remove fileExtension=".woff2" />
      <mimeMap fileExtension=".woff2" mimeType="font/woff2" />
    </staticContent>
  </system.webServer>
</configuration>
Message transformation will be discussed later in this document.
Disable HTTP Request Validation
As mentioned in the previous section, by default, ASP.NET validates values posted to a form. If it detects values that it considers potentially dangerous, then it will throw an HTTPRequestValidationException exception, stating that “A potentially dangerous Request.Form value was detected from the client”. Unfortunately, it considers XML to be potentially dangerous, which is exactly what the SDK posts to the proxy HTTP handler, and denies the request. Therefore, we need to disable this validation. Add or update the following (requestValidationMode) attribute under the system.web element in your Web.config file:
<system.web>
    <httpRuntime requestValidationMode="2.0"/>
</system.web>
Configure the Genie JavaScript SDK
Create the config.js File
To configure some of the functionality of the SDK, you're target project will need to define a config object in JavaScript, which we’ll detail here:
- Add a new JavaScript file to the project under the Scripts/App folder (creating the folder if necessary), named config.js.
Add the following code to the file, which includes the various options you can configure (and some example values):
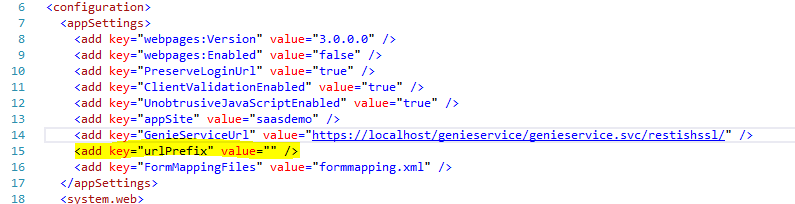
config.jswindow.genie = window.genie || {}; window.genie.config = { // SDK Required Settings appendColonToLabels: true, appSite: 'saasdemo', authenticationMode: 'primary', formmappingFormat: '[p]', formMappingPath: "FormMapping.ashx", implementationId: '', homePage: 'Home', loginPage: 'Login', keepActivitiesOpenForSession: true, maintenancePage: 'Maintenance', messageBundlePath: 'Content/', onMaintenance: false, showAllMessages: false, urlBlobs: 'https://aski.saasplications.com/blobs/', urlBlobsExtended: '', urlPrefix: '{urlPrefix}', urlProxy: 'GenieProxy.ashx', urlProxy2: 'https://localhost/genieservice/genieservice.svc/restishssl/', useBundle: false, xmlNamespace: 'http://www.saasplications.com.au/GenieService', customCreateSessionAttributes: { source: 'portal' }, classNames: { field: { errorMessage: "help-block", errorField: "has-error" }, login: { loginButton: "btn" }, uiMessage: { button: "btn", primaryButton: "btn-primary" } } };- Replace any of the above values with the correct values for the server application that you are connecting to. Be sure to point the urlPrefix to the restishssl binding on the relevant web service. You can have these values set in the Web.Config and have config.js use these values instead. For example in the config.js example above, the urlPrefix is set to '{urlPrefix}' which means that this value should be set in the Web.config as shown below:
- We need to add a generic handler for the config. Right-click the Scripts/App folder and select Add→New Item... and select Generic Handler. Name the new generic handler Configjs.ashx.
Update the code (Configjs.ashx.cs file) with the following code:
	/// <summary>
    /// Summary description for Configjs
    /// </summary>
    public class Configjs : IHttpHandler
    {
        private readonly string _transformedConfigFileContents = null;

        public Configjs()
        {
            string configFile = File.ReadAllText(HttpContext.Current.Server.MapPath("config.js"));

            Regex regex = new Regex("{(.*?)}", RegexOptions.IgnoreCase);
            _transformedConfigFileContents = regex.Replace(configFile, match => ConfigurationManager.AppSettings[match.Groups[1].Value] ?? match.Value);
        }

        public void ProcessRequest(HttpContext context)
        {
            context.Response.ContentType = "application/x-javascript";
            context.Response.Write(_transformedConfigFileContents);
        }

        public bool IsReusable
        {
            get
            {
                return true;
            }
        }
    }
The Configjs.ashx.cs file will need to have the following references:
using System.Configuration;
using System.IO;
using System.Text.RegularExpressions;
using System.Web;
Add a script reference pointing to this new Configjs.ashx file, along with the other references that you added to the ScriptReferences.cshtml file (it should be before all the Genie JavaScript SDK references):
<script type="text/javascript" src="~/Scripts/App/Configjs.ashx"></script>
Create the Genie FormMapping File
- Within the root folder of the web application project, create a new XML file by right-clicking on the web application project and selecting Add→New Item... Then click the Data node and select XML File. Name the new file formmapping.xml.
Copy and paste the following XML into the file to start with a minimal form mapping:
<activities>
  <!-- Activity to view mapping definition elements. name: the name of the Server Activity. form: The clientside View to map the Server
		Activity too. namespace: The namespace id of the namespace element from which to load the view from which may be in a different assembly.
		style: (optional) An activity can be displayed in different styles e.g. a list of Customer view - style="browse" a Customer Details
		view - style="details" tabItem: (optional) TBD. default: (optional) The default Activity to Launch once authenticated e.g. <activity
		name="Samples.Customer" form="Views.Customers" namespace="Main" style="" tabItem="" /> -->

  <activity form="Home" default="true"/>

</activities>
- Within the root folder of the web application project, create a new generic handler for the form mapping by right-clicking on the web application project and selecting Add→New Item... Select the Generic Handler from within the Web node and name the file FormMapping.ashx.
- In your project tree, delete the FormMapping.ashx.cs file as it is not required.
Open the FormMapping.ashx file and ensure that it contains the following code:
<%@ WebHandler Language="C#" Class="Genie.Web.FormMappingHandler" %>
Create a Test Login Page
To ensure that you have configured everything correctly, create or update the Views→App→Login.cshtml page with the following HTML code:
@{
    ViewBag.Title = "Login";
    ViewBag.PageId = "login";
    Layout = "~/Views/Shared/_Layout.cshtml";
}

<div class="main-login">
    <!-- MAIN CONTENT -->
    <div id="content" class="container">

        <div class="row">
            <div>
                <div class="no-padding">
                    <form action="javascript:" id="login-form">
                        <header class="login-form-header">Login</header>

                        <div data-bind="login">
                            <fieldset>
                                <section id="username">
                                    <label>User Name</label>
                                    <label class="input">
                                        <i class="icon-append fa fa-user"></i>
                                        <input id="usernameField" type="text" autocorrect="off">
                                        <b class="tooltip tooltip-top-right"><i class="fa fa-user txt-color-teal"></i> Please enter your user name</b>
                                    </label>
                                </section>

                                <section id="password">
                                    <label>Password</label>
                                    <label class="input">
                                        <i class="icon-append fa fa-lock"></i>
                                        <input id="passwordField" type="password">
                                        <b class="tooltip tooltip-top-right"><i class="fa fa-lock txt-color-teal"></i> Enter your password</b>
                                    </label>
                                    <div class="note">
                                        <a href="javascript:void(0)">Forgot password?</a>
                                    </div>
                                </section>
                            </fieldset>

                            <footer>
                                <button type="submit" class="btn btn-primary">
                                    Log in
                                </button>
                            </footer>
                        </div>
                    </form>
                </div>
            </div>
        </div>
    </div>
</div>

<script type="text/javascript">
    $("#username input").first().focus();
</script>
The above code should produce a rather ugly but functional login page. Ensure that the application server and site manager are running and then start up the new web application (you may need to set the web application as the startup project). If everything has been configured correctly, you should see a login page and be able to login. If you have the application server console open, you should see a successful login has occurred.
If you encounter an issue, please review that you have implemented all of the preceding steps, paying particular attention to:
- The NuGet packages installed (ensure that they are installed for the web application and are the correct version)
- The CSS and JavaScript references
- That you have configured the virtual folders correctly
- That you have configured the generic handlers correctly (GenieProxy.ashx, Configjs.ashx, and FormMapping.ashx)
For information about SaaSplications go to http://saasplications.com.au