Use Sidebar LHS to navigate
For global help click here
7. Using WPF SDK Controls
- Pete Smyrnes (Unlicensed)
- P Sawkins (Unlicensed)
This chapter will guide you through the process of implementing new component to Web Portal using WPF SDK. We will also list down all WPF SDK process menus, and explains only menus that are used in Web Portal.
Adding new component
In this step, we will explain “How to add new JavaScript SDK component and render it as HTML page?”.
We will be creating new component “Chart of Accounts” and adding it to existing list of menus/components.

For each menu, there is corresponding html page which renders when user click on that menu.
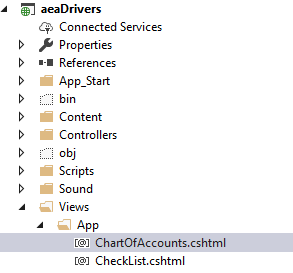
First we have to find where the existing html pages in source code are. You can find in “Views/App” folder. Now, you can copy existing page “CheckList.cshtml” and rename it to “ChartOfAccounts.cshtml” and then add to the project in same hierarchy “Views/App” folder.
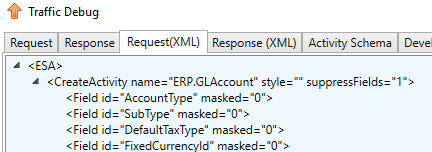
To make appropriate changes in html page, you need to login WPF application (http://apps.saasplications.com/wpf/). In “Financials” menu, press “Chart of Accounts” menu. Then in “System” menu, press “Traffic Debug”. You can see both “Request” and “Response” in both text and XML forms.
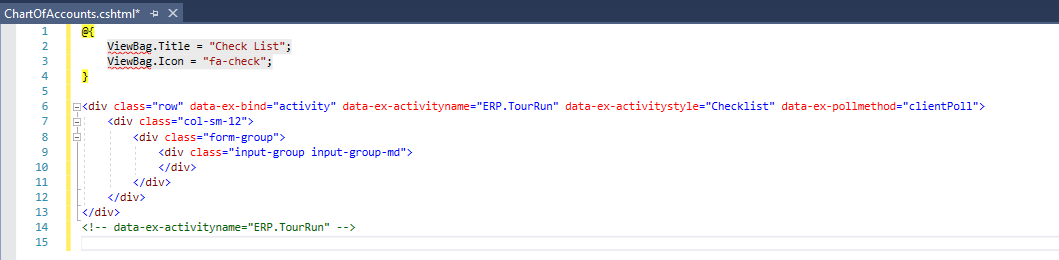
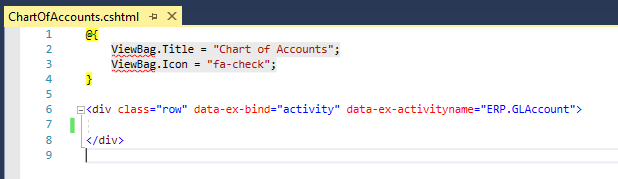
You need to set “ViewBag.Title” to same menu text as is in WPF application which is “Chart of Accounts”. You can keep “ViewBag.Icon” same as was in “CheckList” but you can change if you want.
In Traffic, you can find Activity name and Style.
Now, you need to bind to that activity in your html page.
For now, your html page (empty) is created. Now you need to add this html page to get it displayed in existing menu list.
You can find that file where existing html pages are added, and that is “FormMapping.xml”. You can add your page at bottom.

You can build and run application. You can see new menu “Chart of Accounts”.
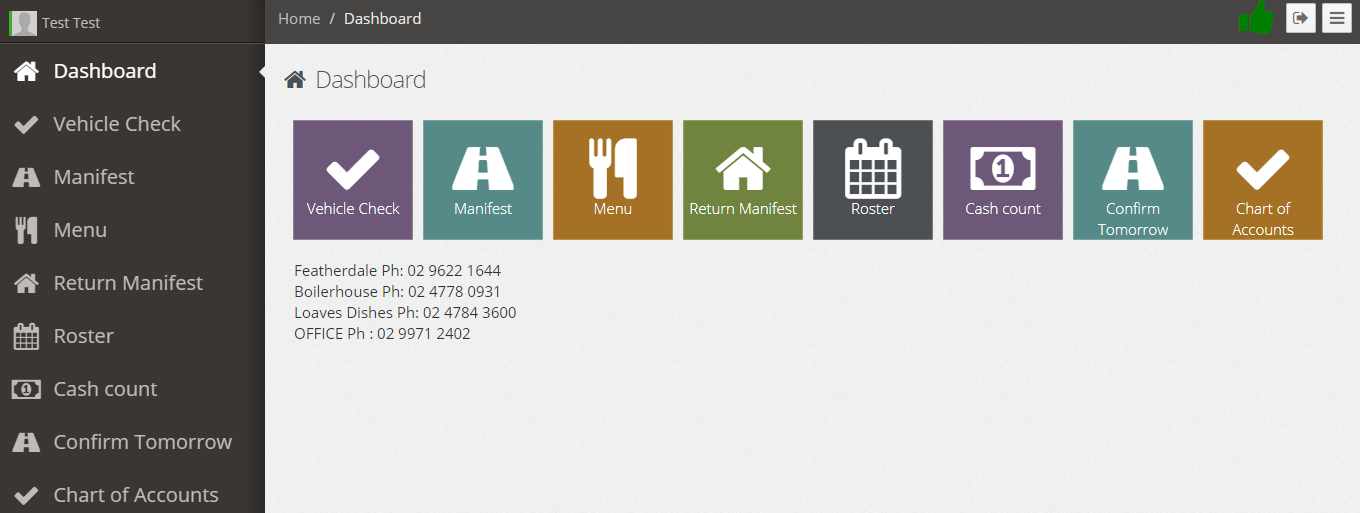
You can see empty “Chart of Accounts” page when you click on new menu.
![]()
Driver
We will list and explain all sub-menus of Driver menu.
Vehicle Check
Vehicle Check is used as safety measure application in which driver has to enter vehicle code/ODO and also check for any issue. If driver see any issue, he must need to report that issue and replace vehicle by finding another vehicle and assigning to himself. Then. he can mark "Vehicle Check Done".
To build Vehicle Check page, we need to see traffic debug and XML request to identify activity name and style.
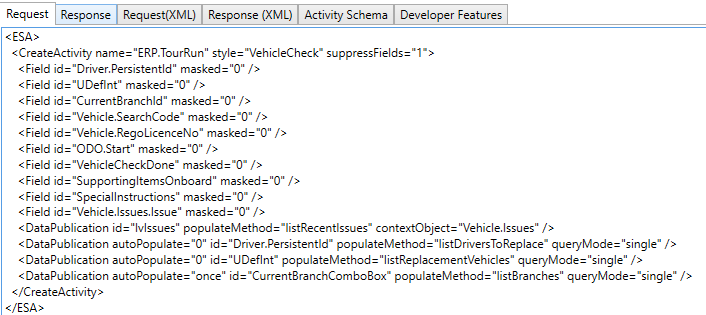
<div class="row" data-ex-bind="activity" data-ex-activityname="ERP.TourRun" data-ex-activitystyle="VehicleCheck">

</div>
We need to replicate fields in Web application as exist in WPF application after adding static header Vehicle code/rego.
Rego/License No
To add static field Rego/License No; use data-ex-bind to "field", and data-ex-fieldid to "Vehicle.RegoLicenceNo".
<div class="input-group" data-ex-bind="field" data-ex-fieldid="Vehicle.RegoLicenceNo"> <label data-ex-attribute="label" class="control-label"></label> <span data-ex-attribute="value" class="form-control-static"></span> </div>
![]()
ODO
To add ODO input field; use data-ex-bind to "field" and data-ex-fieldid to "ODO.Start".
<div class="input-group" data-ex-bind="field" data-ex-fieldid="ODO.Start">
	<span data-ex-attribute="label" class="input-group-addon">ODO</span>
    <input data-ex-attribute="value" type="number" class="form-control" min="0">
</div>

We need to add three tabs Things to Take, Report Issue and Change Driver while making first tab Things to Take as active tab.
<ul id="vehicleCheckTabs" class="nav nav-tabs" role="tablist">
	<li role="presentation" class="active">
		<a href="#things" id="things-tab" role="tab" data-toggle="tab">Things To Take</a>
	</li>
	<li role="presentation">
		<a href="#report" role="tab" id="report-tab" data-toggle="tab">Report Isssue</a>
	</li>
	<li role="presentation">
		<a href="#driverChange" role="tab" id="driverChange-tab" data-toggle="tab">Change Driver</a>
	</li>
</ul>

Now, we need to add contents/fields to each tab.
<div id="vehicleCheckTabContent" class="tab-content">

</div>
We need to display special instructions (if exist) in Things to Take tab. To bind with Special Instructions field; use data-ex-bind to"field" and data-ex-fieldid to "SpecialInstructions".
<div id="vehicleCheckTabContent" class="tab-content">
	<div role="tabpanel" class="tab-pane active in" id="things" data-ex-bind="field" data-ex-fieldid="SpecialInstructions">
		<p style="padding-top: 10px; padding-bottom: 10px" class="col-xs-12" data-ex-attribute="value" data-ex-renderashtml="true"></p>
	</div>
</div>
Report Issue
In Report Issue tab, user can report any issue and can replace vehicle as well.
<div id="vehicleCheckTabContent" class="tab-content">
	<div role="tabpanel" class="tab-pane in" id="report">
	</div>
</div>
To report issue we need to create text field to enter issue and then button to report/save issue. To bind field data, use data-ex-fieldid to "Vehicle.Issues.Issue". To bind button to Save method, use type="submit", data-ex-contextobject='Vehicle.Issues', data-ex-bind="method", data-ex-method="Save".
<div class="input-group" data-ex-bind="field" data-ex-fieldid="Vehicle.Issues.Issue">
	<input id="issueToReport" x-webkit-speech type="text" class="form-control" placeholder="Enter Issue..." data-ex-attribute="value">
	<span class="input-group-btn">
		<button id="reportIssue" class="btn btn-default" type="submit" data-ex-contextobject='Vehicle.Issues' data-ex-bind="method" data-ex-method="Save">Report</button>
	</span>
</div>
![]()
Get Vehicles
Now, we need to list down all vehicles registration number, and show them in drop-down list once user press Get Vehicles button.
To fetch data from service, use data-ex-bind="method" data-ex-method="listReplacementVehicles".
<button class="pull-right btn btn-primary btn-lg" style="margin: 0 5px;" data-ex-bind="method" data-ex-method="listReplacementVehicles">
	Get Vehicles
</button>
To select specific Vehicle number, and bind selected field, use data-ex-bind="datafield" data-ex-fieldid="UDefInt" so that selected vehicle is passed to service using field "UDefInt".
<div class="input-group">
	<span class="input-group-addon">Select Replacement Vehicle</span>
	<select class="form-control" data-ex-bind="datafield" data-ex-fieldid="UDefInt" data-ex-populatemethod="listReplacementVehicles" data-ex-autopopulate="0">
	</select>
</div>
Apply Vehicle Change
To apply vehicle change, user need to press Apply Vehicle Change. To apply this we need to bind method to "applyVehicleChange".
<button class="pull-right btn btn-primary btn-lg" data-ex-bind="method" data-ex-method="applyVehicleChange">
	Apply Vehicle Change
</button>
Now if you build and run, you can see Vehicle check page.

Assign Me as Replacement
In last tab, Change Driver, user can assign vehicle using button Assign Me as Replacement with binding to method "assignMeAsReplacementDriver".
<div id="vehicleCheckTabContent" class="tab-content">
	<div role="tabpanel" class="tab-pane in" id="driverChange">
		<button class="pull-right btn btn-primary btn-lg" data-ex-bind="method" data-ex-method="assignMeAsReplacementDriver">
			Assign Me as Replacement
		</button>
	</div>
</div>

Supporting Items Onboard and Vehicle Check Done
Now, user can mark both fields Supporting Items Onboard and Vehicle Check Done.
<div class="input-group" data-ex-bind="field" data-ex-fieldid="SupportingItemsOnboard">
	<input id="SupportingItemsOnboard" type="checkbox" data-ex-attribute="value" />
	<label for="SupportingItemsOnboard" class="form-control" data-ex-attribute="label">Supporting Items Onboard</label>
</div>

<div class="input-group" data-ex-bind="field" data-ex-fieldid="VehicleCheckDone">
		<input id="vehicleCheckComplete" type="checkbox" data-ex-attribute="value" />
		<label for="vehicleCheckComplete" class="form-control" data-ex-attribute="label">Vehicle Check Completed</label>
</div>

Manifest
Manifest application is used to maintain passenger data in which driver on his vehicle pass on to some hotels and is supposed to pick passengers from that hotels. Passenger personal information is also maintained who take ride.
To build Manifest page, we need to see traffic debug and XML request to identify activity name and style.
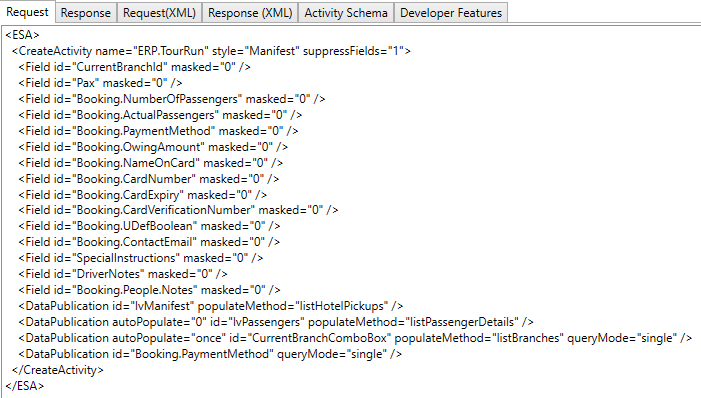
<div class="row" data-ex-bind="activity" data-ex-activityname="ERP.TourRun" data-ex-activitystyle="Manifest">

</div>
Please note that Manifest app is still in-progress. But still we will explain the fields that are displayed in Manifest app. We will explain how these data fields are bound.
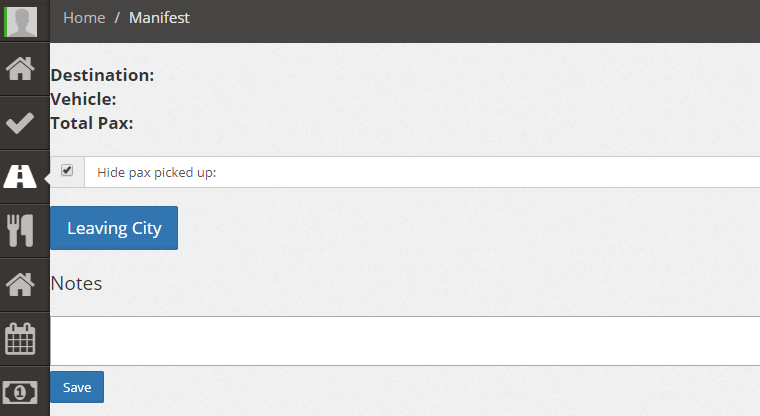
To add Destination field to Manifest app, use data-ex-bind="field" data-ex-fieldid="DestinationId".
<div class="day-info" data-ex-bind="field" data-ex-fieldid="DestinationId"> Destination: <span data-ex-attribute="text"></span> </div>
To add Vehicle field to Manifest app, use data-ex-bind="field" data-ex- fieldid="Vehicle.RegoLicenceNo".
<div class="day-info" data-ex-bind="field" data-ex- fieldid="Vehicle.RegoLicenceNo"> Vehicle: <span data-ex-attribute="value"></span> </div>
To add Total Pax field to Manifest app, use data-ex-bind="field" data-ex-fieldid="Pax".
<div class="day-info" data-ex-bind="field" data-ex-fieldid="Pax"> Total Pax: <span data-ex-attribute="value"></span> </div>
Now we need to add checkbox input field of label Hide Pixed up Pax , and bind field id to "HideCompletedChildren".
<div class="input-group" data-ex-bind="field" data-ex-fieldid="HideCompletedChildren">
	<input id="vehicleCheckComplete" type="checkbox" data-ex-attribute="value" />
	<label for="vehicleCheckComplete" class="form-control" data-ex-attribute="label">Hide Pixed up Pax</label>
</div>
To get list of hotels, we need to fetch data using data-ex-bind="data" data-ex-populatemethod="listHotelPickups" data-ex-autopopulate="1", and display data in table.
<div class="table-responsive">
	<table class="table" id="hotelPickupList" data-ex-bind="data" data-ex-populatemethod="listHotelPickups" data-ex-autopopulate="1"></table>
</div>
Now we driver can press Leave City button once pickup is complete.
<button id="leavingCity" type="button" data-ex-bind="method" data-ex-method="pickupsComplete" class="btn btn-lg btn-primary">
	Leaving City
</button>
Then notes can be added using Notes field with binding to "DriverNotes".
<div data-ex-bind="field" data-ex-fieldid="DriverNotes">
	<h3>Notes</h3>
	<textarea data-ex-attribute="value" style="width: 100%; height: 50px; resize: none;"></textarea>
	<button class="btn btn-primary">Save</button>
</div>
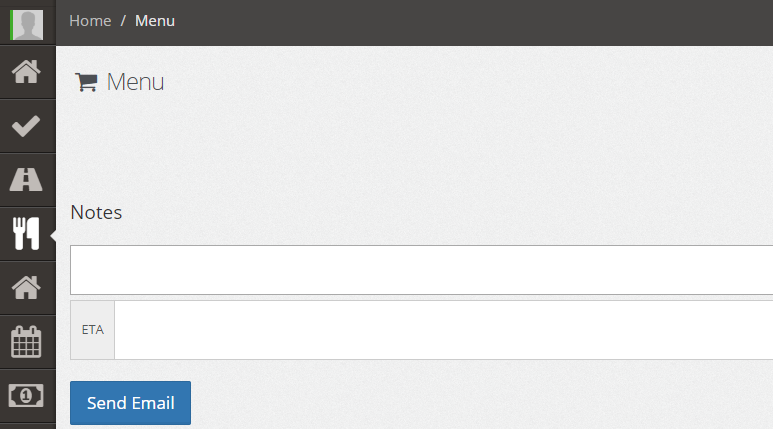
Menu
Menu app is used for Meal selections. Who would be supplier? How many guests are there? What are the selections of menu items? What is the estimated time of arrival?
To build Menu page, we need to see traffic debug and XML request to identify activity name and style.
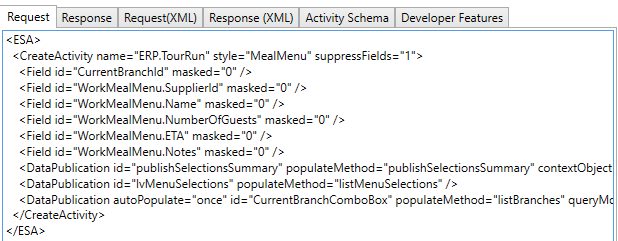
<div class="row" data-ex-bind="activity" data-ex-activityname="ERP.TourRun" data-ex-activitystyle="MealMenu">

</div>
Please note that Menu app is still in-progress. But still we will explain the fields that are displayed in Menu app. We will explain how these data fields are bound.
To fetch data for all menu items, we need to build request and bind fields and display data in table as follows:
<div>
	<table class="table" id="mealMenuSelections" data-ex-bind="data" data-ex-populatemethod="listMenuSelections"></table>
</div>
To fetch data for only work meal menu items, we need to build request and bind fields and display data in table as follows:
<div>
	<table class="table mealMenuSelectionSummary" id="mealMenuSelectionSummary" data-ex-contextobject="WorkMealMenu" data-ex-bind="data" data-ex-populatemethod="publishSelectionsSummary">
	</table>
</div>
Notes
To add Notes field to Menu app, use data-ex-bind="field" data-ex-fieldid="WorkMealMenu.Notes".
<di  data-ex-bind="field" data-ex-fieldid="WorkMealMenu.Notes">
	<h3>Notes</h3>
	<textarea style="width: 100%; height: 50px;" data-ex-attribute="value"></textarea>
</di>
ETA
To add ETA field to Menu app, use data-ex-bind="field" data-ex-fieldid="WorkMealMenu.ETA".
<div data-ex-bind="field" data-ex-fieldid="WorkMealMenu.ETA">
	<span>ETA</span>
	<input id="mealMenuEta" tabindex="1" data-ex-attribute="value" type="number" class="form-control" />
</div>
Send Email
To add Send Email button to Menu app, specify type="button" data-ex-bind="method" data-ex-method="sendSelectionsEmail".
<button id="passengerNoShowButton" type="button" data-ex-bind="method" data-ex-method="sendSelectionsEmail" class="btn btn-lg btn-primary">
	Send Email
</button>
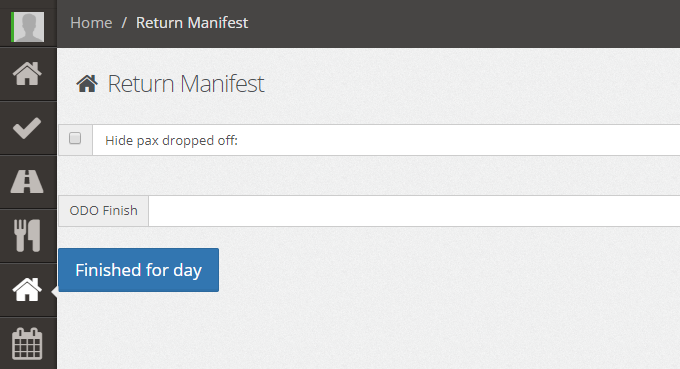
Return Manifest
Return Manifest application is opposite to Manifest application. In Manifest, passengers were picked up from hotels but in Return Manifest passengers are dropped off back to their places.
To build Return Manifest page, we need to see traffic debug and XML request to identify activity name and style.
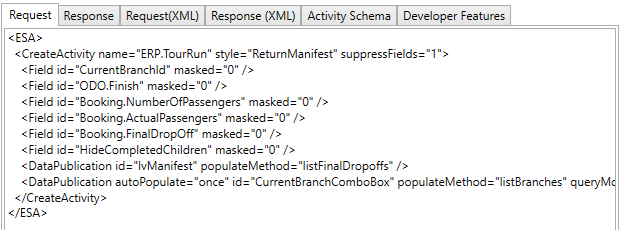
<div class="row" data-ex-bind="activity" data-ex-activityname="ERP.TourRun" data-ex-activitystyle="ReturnManifest">

</div>
Please note that Return Manifest app is still in-progress. But still we will explain the fields that are displayed in Return Manifest app. We will explain how these data fields are bound.
To get list of drop-off locations, we need to fetch data using bindings as follows and display data in table.
<div class="table-responsive">
	<table class="table" id="finalDropoffList" data-ex-bind="data" data-ex-populatemethod="listFinalDropoffs"></table>
</div>
To hide drop-off location, we can add checkbox Hide Dropped Off so user can hide or show drop-off location.
<div data-ex-bind="field" data-ex-fieldid="HideCompletedChildren">
	<input id="vehicleCheckComplete" type="checkbox" data-ex-attribute="value" />
	<label for="vehicleCheckComplete" class="form-control" data-ex-attribute="label">Hide Dropped Off</label>
</div>
Then driver can finish day by pressing button Finished for day and entering ODO meter reading.
<div data-ex-bind="field" data-ex-fieldid="HideCompletedChildren">
	<input id="vehicleCheckComplete" type="checkbox" data-ex-attribute="value" />
	<label for="vehicleCheckComplete" class="form-control" data-ex-attribute="label">Hide Dropped Off</label>
</div>


<div data-ex-bind="field" data-ex-fieldid="ODO.Finish">
	<span data-ex-attribute="label" class="input-group-addon"></span>
	<input data-ex-attribute="value" type="number" class="form-control" min="0">
</div>
For information about SaaSplications go to http://saasplications.com.au